
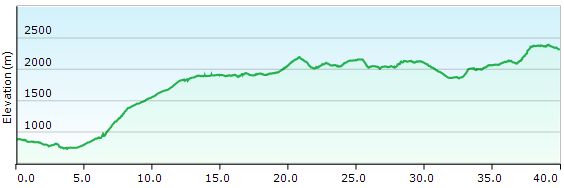
Travelogue on
‘The Dreampath’: Munich – Venice.
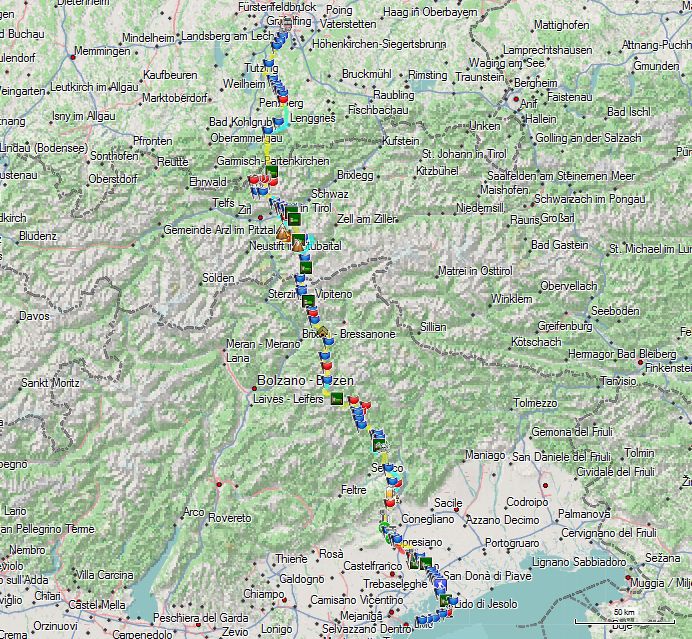
Countries: Germany, Austria, Italy
Region:Inn Valley, Karwendel Group, Ziller Valley, Puster Valley, Puez-Geisler National Park, Sella Group, Bindelweg (Viel del Pan), Civetta Valley, Bellunese Dolomites, Veneto.
Range:Munich – Venice (and sometimes vice versa)
Period: 27th August 2010 until 26th September 2010 (Updated 2024)
Travel companion: solo
Public transportation:
To: Brussels-South(Midi) – Munich (night train)
Return: Ryanair:Treviso (near Venice) to Charleroi.
Lodging:
Mountain huts in the high mountains section: (56€ per person per night in half-board as a member of a mountain sports organization in a dorm).
Hotels in the lowlands and valleys: from 45 to € 120 in a room with breakfast per person per night
Payments:
- Cash
- ATM(note: only available in the valleys and lowlands)
- Visa (note: not easily accepted, given the small amounts.)
- Cash Pickup with Visa expensive.
Travel Literature:
– Dumont walking guide: Von München nach Venedig (Dumont aktiv series, (in German of course www.dumontreise.de )
– The sixt edition of the Alpenüberquerung München – Venedig (2022) now exists from Rother (In German of course, with waypoint coordinates and two types of track logs.) In my opinion the best and most detailed guide especially at this time.No risk of getting lost, but it does presume a sense of the adventure.
Survey maps:
Only the maps drawn in the guide and the digital relief maps in the Garmin GPSMAP device. Additional digital maps uploaded from freizeitkarte-osm.de using (Garmin) Mapsource. Especially the region map of the Alps is interesting in this case.
The Garmin unit can save 10,000 Track Log points.
To save the simplified track logs belonging to the Rother guide for the entire route Munich Venice you need 5 x 500 = 2500 points.The original, not simplified track logs contain 10,000 waypoints for each of the five sections.
The Rother file also contains 255 waypoints.The file belonging to this travelogue contains 832 waypoints.
Internet:
www.nshispeed.nl/nl/internationale-treinplanner
https://www.nightjet.com/nl/reiseziele/deutschland/muenchen
Personal information:
The Dreampath (Munich – Venice)
Introduction:
At the time I undertook it, this tour was just about the most complex journey both in terms of preparation and execution.This tour belongs in the most difficult category, by its length in combination with the requirement of an absolute possession of walking techniques on all terrain (rock, gravel, and to a lesser extent on snow) and a good familiarity with the handling of steel securing cables and Klettersteig or Via Ferrata-equipment for those wishing to execute the Chiara crossing.
I myself had planned 31 days for this trip, including the return trip.In fact, this came down to 26 scheduled walking days and 3 days of rest.In practice have done it in 24 walking days and 5 rest days, and this mainly under the influence of the weather. The Dumont guide sets forwards 30 walking days, Rother 29.It was my intention to complete the entire journey on foot between Munich and Venice, without the use of cable cars. But even without the in my view unnecessary detours and extras, such as the alpine variant to the Lizumer Hut or the detour over the Coldai and Tissi Hut.And it worked out, even though I have walked more from Venice to Munich, then in the foreseen direction and this because of the weather and especially the snow.Because of the snow, I also couldn’t cross three passes, for which I had to take an alternative path through the valley.
Physical preparation:
The better your physical condition is at the start, the greater the chance is that you will enjoy your trip. With the increase of years, I get more and more convinced of the need for good physical preparation. Walking in rolling country or low mountains is good, but it will never match a 2500 altimeter climb in combination with a 1000 altimeter descent.
A year before this trip, I lost 10kg, for the simple reason that not only every kilo of equipment that you carry bears weighs, but also every kilogram of overweight.And so I brought my BMI below 25 and it will remain on that level from now on.
Logistical preparation:
Send one week before you leave a cardboard box with your full Via Ferrata set on to:
Fam.Cordella,
Rifugio San Sebastiano, Passo Duran
I-32010 Goima di Zoldo Alto (BL)
Italia
Or:
I-32010 Passo Duran, La Valle Agordina BL
Tel: 0039/(0)437/62006
+39 3496848307
I didn’t do this, so I could reverse the circuit. But once in Alleghe, I did send my Via Ferrata set home (just under 2kg with post box. The weight must remain under 2kg to be sent home as registered mail in Italy). In case you would encounter difficulties as I did in Austria in terms of weather and you did send your Via Ferrata set to the Passo Duran, you can take the train to Niedervintl and keep walking in the normal direction.This was also my first plan, but then I’d have to take a train three times.Given the fact that I had the Via Ferrata set on me, I decided to go to Belluno, which saved me a train journey.Know however that the reversed sense is more difficult than normal one, except for the Chiara crossing (Via Ferrata). Before my return to Belluno for the flat part to Venice, I also sent back to Belgium: my hiking boots, sleeping bag, torch and some rope.(Together, 2.5kg including cardboard post box. In Austria, it is automatically registered mail, no weight limit)
Via Ferrata technique:
- Make sure that both karabiners are locked into place on the cable in vertical passages.If you need to pass a point of attachment of the cable, you will have to detach one karabiner at a time (critical moment).When making a maximum fall with only one karabiner snapped on, there is a risk of fracture (primarily of the karabiners seen that they are weaker than the band slings of modern Via Ferrata sets, (Berg und Steigen, OAV).With horizontal fixation cables, a single karabiner snapped on is sufficient. This will be switched at the height of a fixation point of the cable, considering the load in a fall on a horizontal cable is smaller than on a vertical stretch.In plain language: in a vertical passage, you fall to the next point of attachment of the cable plus the length of your Via Ferrata set to absorb the shock.On horizontal passages, you fall solely over the length of your Via Ferrata set plus any stretch and slack of the cable.
- Work quickly, but carefully.The longer you are in the critical passages, the longer you stress your muscles.Nothing is more annoying than a queue in the critical passages, in which you have to wait in uncomfortable positions.So look ahead and wait in a more comfortable position if the next passage is not free.
- Hook your arm around a sport of a ladder in a hangover, while you unsnap your karabiner one by one, to bring them over an attachment point. On highly technical routes, the use of a third karabiner is recommended. This one is attached closely to the tie-in point of your harness. You can hook this third karabiner on to the cable or a sport, as to have both hands free, so you temporarily relieve your muscles.
- Do not overload ladders or ropes.In principle, only one person is allowed on a cable section between two attachment points.
- Do not make your own Via Ferrata set: knots are weaknesses and less strong than the buckles or stitchings used by certified mountain sports equipment manufacturers.Buy a recent Via Ferrata set.Old sets sometimes have had production flaws, which afterward have been established to be insufficiently strong in tests under exceptional forms of stress.(The production date is always listed somewhere on the packaging or the label of the product itself.)
- Treat your material carefully.Your life depends on it.
- Wear your helmet.
- Make sure you have eaten enough before you commence a critical passage.Provide a few power bars within reach.Provide drinking within easy reach.(Camelback or similar hydration system).Optionally add an isotonic powder to your drinking water.
- Do not overestimate your own experience or physical condition.Build up gradually.
Equipment and supply:
Clothing on your body:
- Shoes: For longer tours with a reasonable ridge of technical difficulty, I nowadays usually use a combination of 2 shoes, namely:
- A pair of approach shoes type A (The North Face Hedgehog)
- Shoes: boots of the type B or C (La Sportiva Evo Trek) preferably from a known brand and preferably in combination with a layer of Gore-tex.
- Set of socks: preferably 2 of good quality (loop fabrics on the inside and ranging in materials from wool to Coolmax)
- Summer climbing pants (Mammut Schoeller Dryskin) or a cheaper alternative from Decathlon.
- Synthetic underwear: briefs (my preference goes to the microfiber ones by Nur Die) and T-shirt with long or short sleeves (for sale at Decathlon or the classic outdoor sports shops)
- Lightweight fleece
- Sun hat (Decathlon)
Clothes in your backpack:
- Gore-Tex jacket with hood or rain hat (Outdoor Research). (Gore-Tex still enjoys my preference, but those who are deterred by the high purchase price, may find reasonable alternatives at the Decathlon store)
- Sunglasses with high filtration rate, sunscreen (SPF 20 or higher) and possibly lip balm with sun protection)
- Replacement synthetic T-shirt and slip
- Set of spare socks
- Set of spare clothing (shorts with your spare T-shirt) to wear in the cabin and cabin slippers. In most lodges you can’t enter in your hiking boots, but the floor isn’t sufficiently even, to just walk around wearing only socks. Being a tent hiker, I did not bring sneakers. This saved at least 450g. For such a trip everything counts. I started off with a dry backpack weight of 17 kg.
Other equipment:
- Telescopic walking poles (relieves the pressure on the knees, when descending). It is advisable to buy poles of well known brands: Leki or Decathlon, as a cheaper alternative. Even cheaper are Naturehike poles bought on AliExpress. Pay attention to the material of the handles (no hard plastic) and eschew particularly sticks with a buckle in the hand strap. Prolonged use will irritate your hands at the buckle.
Backpack of 45+10l.van Lowe Alpine, which is lighter than my previous model from Decathlon. Despite the fact that the backpack comes with a rain cover, I always put everything in plastic bags closed with a metal clip. Small gear and daily rations go into freezer bags from Aldi. - Silk sleeping bag liner (Sea to Summit)
- Cabin type sleeping bag 10° (Decathlon, used twice, as I had it with me anyway, but I wouldn’t drag it with me a second time :-)).
- 1 towel 50 x 30 cm, preferably in micro fiber (dries faster and carries less odor, when not dried properly.)
- 1 small bottle with a shower soap and shampoo, a washcloth, a small travel toothbrush with toothpaste (you can also save an almost empty tube for travel), a stick of shaving soap and disposable razor blades or an electric travel shaver on batteries.
- A few packets of paper handkerchiefs, does double duty as toilet paper.
- A Camelbak preferably with a total capacity of 2 to 3 liters (see trip descriptions for sources along the way.) Don’t know whether I like the new models with the zipper closure.
- Opinel knife or Swiss Army knife
- Micro Headlamp (Petzl Tikka Plus 2) to find your way back to your tent in the dark.
- Personal pharmacy: bandages, sterile gauze, antiseptic, wound plasters, scissors, sports tape, Compeed, ibuprofen, paracetamol, Rinomar (for runny nose) Immodium (generic: Loperamide for diarrhea).
- Spare plastic bags
- Needle and thread
- GSM (network coverage not assured) or GPS with combined satellite phone for those who can or are willing to pay for it.
- Orientation aids: GR 20 guide with topographical maps (see above), compass and / or GPS
- Mosquito product (Care Plus)
Technical equipment:
- Via Ferrata set Y-shaped with non-elastic band slings and Salewa Attack karabiners (imitated by Mammut or Camp). Avoid screw-lock or twist-lock karabiners which are considered to be too tiring and slow to use, leading to improper use.
- Integral climbing harness.
- Climbing helmet (Black Diamond or Petzl) with Buff or bandana against sweat.
Diet:
According to the dietetics, the optimal balance for food contents is: 15% protein, 30% fat and 55% carbohydrate. For certain sports, this mixture should contain even up to 70% carbohydrates.
But keep in mind that fat contains more calories for the same weight of food then carbohydrates.
My menu is composed in such a manner that I basically all I have to eat along the way, can be eaten out of the hand.This is useful in bad weather conditions and also saves the weight of packaging materials, cutlery, etc …
My daily ration for the road I stuff in a separate plastic bag per day.If it rains, I put that bag in the place where I normally put my raincoat so that there is no need to open up the backpack every time your energy level needs to be complimented.
I, myself weigh approximately 74 kg. Those who are heavier will probably need more calorie in proportion.
A menu should be sufficiently varied and should, of course, be acceptable to you.
However, know that at home, I also eat something different than this.
Many sports bars already state their composition. If this is not found on the packaging, you will have to use a general list of the composition of different types of food, which can be found in a book about dietetics at the library or on the Internet. If you know that 1g of proteins corresponds with 17 kJ or 4kcal, 1g of fat with 38 kJ or 9 kcal and 1g of carbohydrate with17 kJ or 4 kcal, then you can calculate it yourself.
| Name: | Gr.: | Prot./
100gr: |
C.hydr/
100gr: |
Fat/
100gr: |
Cal/
100gr: |
KJ/
100gr: |
Prot %: | C.hydr %: | Fat %: | Total Calor |
| Muesli Bar | 63 | 5,5 | 77,0 | 9,0 | 418 | 1765 | 3,5 | 48,5 | 5,7 | 263,3 |
| Energie Bar | 80 | 5,4 | 72,3 | 9,2 | 392 | 1653 | 4,3 | 57,8 | 7,4 | 313,6 |
| Chocolade with nuts | 40 | 9,2 | 49,7 | 36 | 564 | 2353 | 3,7 | 19,9 | 14,4 | 225,6 |
| Snickers | 50 | 10,0 | 50,9 | 27,9 | 500 | 2090 | 5,0 | 25,5 | 14,0 | 250,0 |
| Gingerbread | 40 | 3,2 | 74,0 | 1,0 | 323 | 1371 | 1,3 | 29,6 | 0,4 | 129,2 |
| Total: | 273 | 17,7 | 181,3 | 41,8 | 1181,7 | |||||
| %: | 6,5 | 66,4 | 15,3 |
The chocolate is usually from Ritter Sport. Alternatives can be found also at Lidl or Aldi.
Energy Bars can be found at Aldi of Lidl. Foré (fake Snickers) can be found at Aldi. Buy hard muesli bars, not the soft variety, because they crumble easily when being stored in your backpack. Otherwise, you need to keep them in a box which adds extra weight.
Access:
The night train to Munich leaves around 18.48h in Brussels-South (Midi) and arrives at Munich Öst around 05.45am, from where it continues towards Vienna. That way you will win one day.
Upon arrival at the car assigned to me, the seating position 57 is non-existent (Franz Kafka or candid camera?) The numbering in the relevant wagon went on from seat 56 to seat 72. After addressing the staff about it, I was answered, that I had to find a place myself.What is the use of a reservation?Fortunately, the car was not full and I sat in the last compartment, closed the curtains and sat there for the rest of the night alone and at ease.
Notes on the GPS waypoints:
All the blue flags and pins, and also the most overnight locations, are located with the GPS on the ground.Red flags are positioned on the map and can show some deviations with the reality on the ground.Red flags were positioned to clarify the route, where insufficient points were recorded on site.This was also the case between Jachenau and the Karwendelhaus, where my GPS was temporarily out of order, due to moisture penetration because of the driving rain, despite an IP X 7 standard (30′ submerged in 1m of water).
Day 1: Munich – Wolfratshausen
(33,4 km – 8h30‘ + 60m).
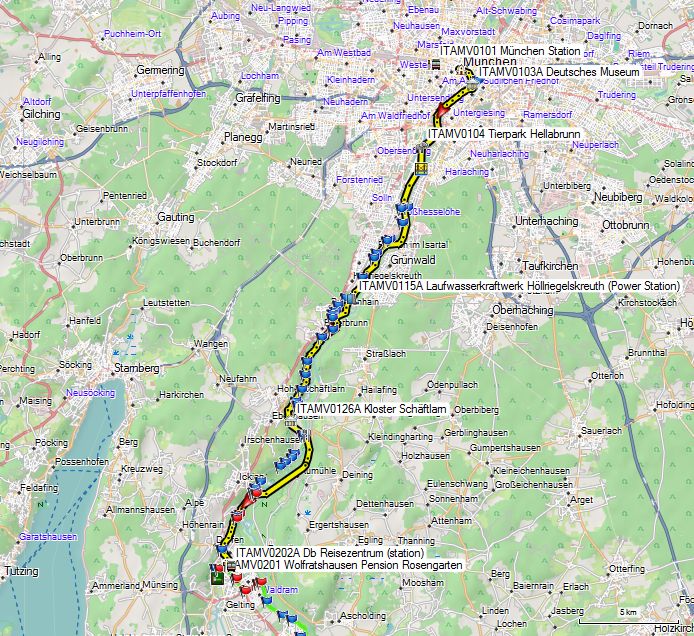

 From the platform at the railway station, you go to right and once in the street (ITAMV0101), you turn left in the direction of “Centrum” (City Centre – ITAMV0102).At this hour on a Saturday, it is still very quiet.Only the bakers are already busy.Beyond the Marien Platz, you walk in the same direction.A bit further, you see the first signs of the bike path next to the Isar (river).You cross the Isar via a double bridge, where you have access to the Deutsches Museum and you reach waypoint ITAMV0103. From here on, you follow the Isar.A little further there are two possibilities: either you follow the cycle path, which is in asphalt or fine gravel or you follow the path through the riverbed, which is difficult to walk on, because of the river gravel.You still have 30 km to go, so you better do not keep on walking in the riverbed all the time.
Once you reach the Tierpark Hellabrunn (ITAMV0104), you have to decide how you want to go to Wolfratshausen.The simplest solution is to continue to follow the cycle path along the same river bank.You are assured of a good surface, but it might be a bit monotonous.
At the time of execution of this trip, the Rother guide was not available yet. The Dumont guide didn’t come with a GPS tracklog. I tried to follow the route in the Dumont guide, through the Isar valley based solely on local signposts along the routes. This proved to be difficult. In retrospective, it seems preferable not to use the high bridge, but the bike bridge before that at waypoint ITAMV0105 and to walk along the bike path on the other side, closer to the river than the route that is followed in the Dumont guidebook. Using the Rother tracklog is the easiest solution because it saves you the hassle of studying local signposts.
If you use the high railway bridge (ITAMV0106) to reach the other shore, you’ll find a signpost indicating local cycling routes. This way, you end up too close to the busy B11 at waypoint ITAMV0116, where you can take the first turn-off towards the valley (ITAMV0118) to leave the asphalt (ITAMV0119) and follow signs of Isartalverein to the riverbank.Know however that the paths of the ITV (Isartalverein) are not always the easiest to tackle, especially in periods with plenty of rain.
At waypoint ITAMV0125 you will find signs to Kloster Schläftlarn.You can try to stay on a path following the dike along the riverbank. At waypoint ITAMV0127, you reach the road.
The Rother Tracklog sends you across the bridge and before the bridge of the Isarwerkkanal you turn right to follow this run-off canal of the Isar along a path on its left bank. At waypoint ITAMV0134, both variants join together. The Rother variant is the lighter one.
At waypoint ITAMV0127, you can also continue along the dike. At a landfill of construction waste (ITAMV0128), you need to leave the dike. What follows then, can be at least regarded as an adventurous stretch.The wet weather conditions didn’t make progress any easier.The path is very narrow and seems popular with mountain bikers. At one point you have to ford a stream, where only a few narrow beams function as a bridge, and so you’ve got to use your sticks, to maintain balance. Because of the density of the vegetation, you have no reference point as to where you are.
From waypoint ITAMV0135 on, the going becomes easier again, when you arrive at a better path.Eventually, you arrive at a road next to a railway track. At the time, this road was very dirty because of major construction works on the tracks, but that’s obviously a temporary situation.At the end of this road, you reach the departure place of the rafts on the Isar.This appears to be an entirely commercial affair, where passengers of tourist buses are marketed to float on rafts, together with a brass band. You can hear them, but they are difficult to spot, because of the dense vegetation.
From waypoint ITAMV0138 on, you can follow the B11 to waypoint ITAMV0139.
The inn where I slept in 2010 is currently closed.
Alternatives can be found on Booking, Preiswert-uebernachten.de or Airbnb.
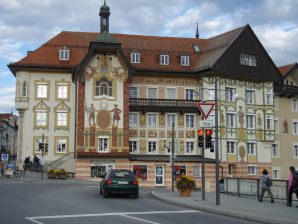
Day 2: Wolfratshausen – Bad Tolz
(26,7km – 6h45’+100m.)
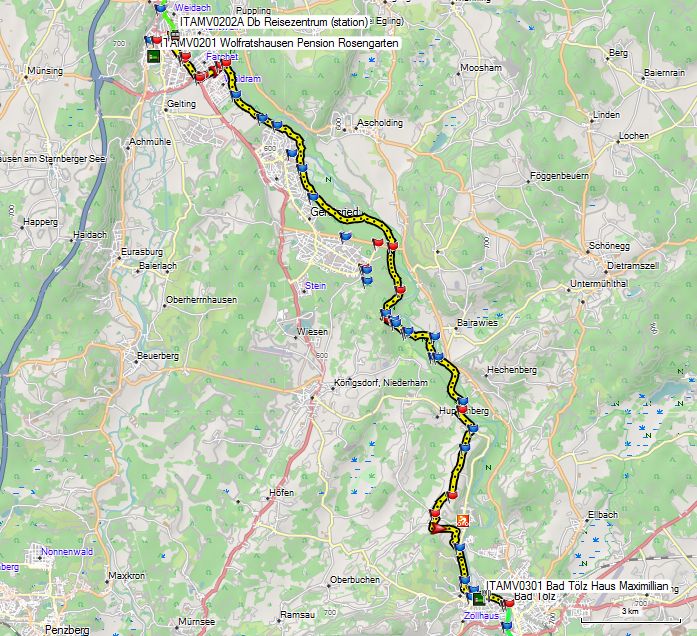

From Pension Rosengarten (ITAMV0201) you walk back to the road B11 at waypoint ITAMV0139.You turn right. Across the river turn right again (ITAMV0202) and you follow the road past the railway to a crossroad with traffic lights (ITAMV0203).Here you turn left and immediately right (ITAMV0204). Follow this road to a bridge over the Loisach – Isar Kanal (ITAMV0205).Cross this bridge follow the canal to the left until just before its mouth in the Isar river (ITAMV0206). Here you follow the cycle path to the right until the beginning of Gartenberg (ITAMV0209). Here you follow the edge of the village until you reach waypoint ITAMV0212. From here on, you find a cycle path through the forest. You can continue along this cycle path until the onset of Geretsried. At waypoints ITAMV0213 & 14, you cross the road. Then you continue along the road on a newly constructed bike path until the first cross street (ITAMV0215). Here you turn right into a very straight path (ITAMV0216) which extends into the forest. Here you go left and then right (ITAMV0217) and upward along a gravel road into the forest. You end up high above the river (ITAMV0219). Here you leave the bike path because it diverts too far away from the Isar river and gains too much altitude.You descend towards the river (ITAMV0220 to B24), where it is difficult to walk because of the round pebbles, typical for a river bed. At waypoint ITAMV0224 the path makes a notable nod to the right, to return to the river at waypoints ITAMV0225 & 26. At waypoint ITAMV0227, there is a split between the variant along the river and the one over Rimslrain. Take the one via Rimslrain, because the one along the river isn’t much good. You walk up to the road and continue along it until you reach waypoint B28.Here you turn right. The road climbs to the hamlet Rimslrain.Do not be tempted here to follow the “Learning Path”(ITAMV0229), which descends back to the river. Follow the Dumont guide and keep going along the asphalt until Leitzing (ITAMV0230). At the beginning of the agglomeration, near a bus stop, go left on a dead-end street You pass underneath and to the left of a white chapel, to descend along a forest road down to the main road (ITAMV0231), where you can follow the separate cycle path to Bad Tolz. At waypoint ITAMV0233, the bike path leaves the road and continues along the lake. At waypoint ITAMV0234 you go inland.
Haus Maximillian, Seppstrasse 5, Bad Tolz was torn down.
Alternatives can be found on Booking, Preiswert-uebernachten.de or Airbnb.
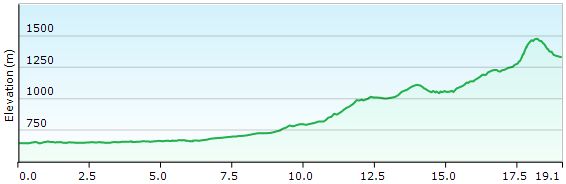
Day 3: Bad Tolz – Tutzinger Hut
(19,1km – 6h +730 m -150m).

 Via waypoint ITAMV0302 and 03, you walk towards the roundabout at the center of Bad Tolz (ITAMV0304) and continue straight along the river on the same shore. At waypoint ITAMV0305, you leave the road for a bike path in fine gravel. You follow this until you arrive at Arzbach (ITAMV0306).When you arrive at waypoint C07, at the height of the Arzbach church, you turn right to the church itself (ITAMV0308). Here you find a signpost towards Unterbergen (ITAMV0309). Follow this road first perpendicular to the Isar. Then the road makes a turn in the anticlockwise sense. The road narrows and reaches a peculiar crossroad where the road continues straight ahead and changes into a gravel road shut off by a barrier. Here you turn left (ITAMV0310) across the river and then upwards to the right (ITAMV0311). The road consists of asphalt and partly of rubble. It climbs to a parking lot (ITAMV0313). At the end of the parking lot, you go over a bridge and take the rising road. It climbs steeply again.After several hairpin bends, you arrive at a fork (ITAMV0314).
To the left, you find a signpost “Benediktenwand” and “Brauneck”. To the right, it is waymarked as “Neuwirtshütte”, which is unknown to me. You take the road to the right here. Higher up, you will find a fork (ITAMV0315), where you go right at the first signpost towards the Tutzinger Hut. The road climbs up to the saddle (ITAMV0316).Here you go straight ahead and follow the descending road, which is in poor condition (ITAMV0317). The road continues to drop until you reach a hairpin bend, after which the road starts to rise again. You cross a bridge, after which the road climbs again (ITAMV0318).The landscape opens up. The gravel surface ends and the road makes a hairpin bend to the left (ITAMV0319). It climbs slightly and turns to the right and continues up to a shepherds hut (ITAMV0320).
If you still wear low shoes, switch them for high ones, because what follows behind the shepherd’s hut, is a very swampy terrain.In combination with the presence of the cows, you experience lots of difficulties to find walkable terrain here. Also, orientation is difficult because of the lack of a clear path, that is destroyed by the cows’ feet, especially in the lower section. The waymarks are pretty vague. Higher up, you will find a signpost.You cross a small ridge (ITAMV0323) and then you go down. First, you see a private cabin.A little bit further, you reach the Tutzinger Hut (ITAMV0401) with an existing part and an after the avalanche of 2009 newly constructed part.
Tutzinger Hut (1327m):
Beds: 71
0049 / (0) 175/1641690
Overnight: € 11 (members mountain association) (2024)
The food here was pretty bland in 2010.There were problems with the food hygiene. You got the impression that they d’ rather sell drinks than food.
The current website gives a better impression.
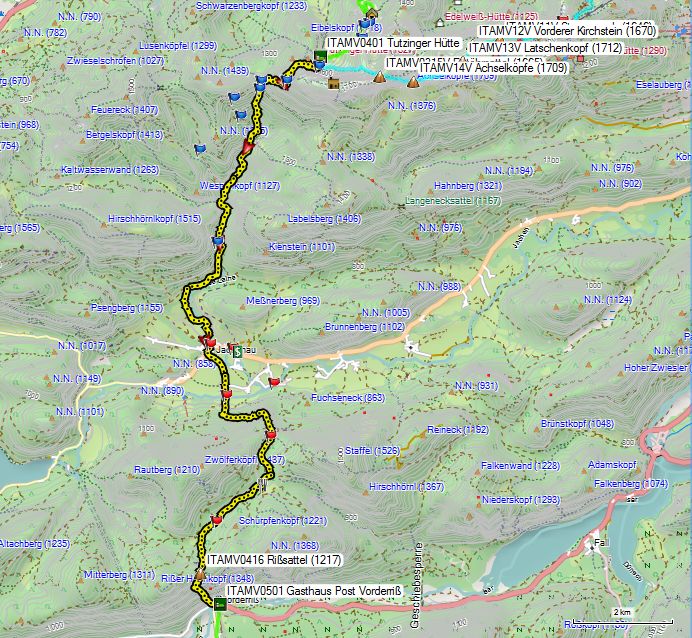
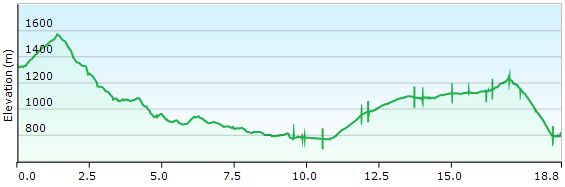
Day 4: Tutzinger Hut to – Vorderriß
(18,8km – 6h + 660m – 1170 m)
The climb from the hut to the saddle is well marked and well executed.You climb to the pass, but you do not descend immediately.You walk about ten minutes in the direction of the Benediktenwand until you cross a brook after which you start the descend towards Jachenau in the valley (ITAMV0402). From here on, the path descends fairly quickly.Due to the continuous rain, the track was quite slippery and in this case, it serves you well to watch out for slippages. Lower in the woods, you find a split (ITAMV0403) at which you continue to descend further in the same direction. Then you reach a new gravel road (ITAMV0405), which didn’t appear on the older digital maps. Here you can still choose: either you descend further down along a path towards the “old” gravel road, or you descend along the new road until you reach the old one. Given the rain, I opted for this last possibility. When at waypoint ITAMV0407 you reach the original gravel road and from here on, you continue to Jachenau. There is nothing wrong with the landscape around here, but given the driving rain, it was less fun.
When at waypoint ITAMV0409, there is a possibility to cross the river by a bridge and continue to descend along the right bank along a path to Jachenau center, but I did not test this option because of the rain.
Somewhere beyond this waypoint D09, my GPS stopped functioning, despite the IPX 7 waterproof grading (30′ submerged in 1m of water). Because of the rain, the keyboard was no longer operable and there was no other option but to removed the batteries, because the on/off button quit functioning. The GPS still logged the position, but all other options were unavailable.
In bad weather conditions, the best option is to continue along the same path, always in descending in the same direction and always remaining close to the river Grosse Laine. You ignore all side roads of minor quality.
Eventually, you reach the asphalt road in the valley (ITAMV0410). Here you turn left, and right into the first road. Here you will find a spacious bus shed, where I took a meal break while sheltering from the rain. Opposite this bus shed, you find a bank branch with an ATM (ITAMV0411), where you can supplement your cash reserves.
You hit the road at the bus shed and follow it to the river, which you cross, to turn left consecutively (Signpost: Point Niggeln). At the end of the road, there is a path along the river. The path follows the river to the next bridge. Here you will find the first signposts to Vorderriß. Cross the bridge and walk in the direction of a few houses. Once you reach the asphalt, turn left. You follow this street until you reach the last house. Here you cross the river again and the asphalt surface changes into gravel. Further on, the gravel road makes a turn to the left at which time you can go straight up a steep path (red markers). Despite the rain, I followed this path. Higher up, you return to the gravel road, which you follow to the right until the junction (ITAMV0413), with a signpost: left to the Lainer Alm and right to the Polder Luit Alm. You turn left here. At the Lainer Alm (ITAMV0414) you are tempted to take a break, but in the curve that the road makes around the Alm hut, you continue straight ahead along a non-drivable road through the woods and follow the blue waymarks. Later on, you reach a gravel road. You follow it until it joins the road along the other side of the river, which you follow until both end up together at the Luit Polder (ITAMV0415). Here you need to either round the fence or pass over the grounds of the Alm farm. You’ll find blue waymarks, which can lead to the Risssattel by a fairly swampy area. Here and there, there have been attempts to put up primitive boardwalks in the form of planks and tree branches, over some of the marshiest parts, but you better don’t cross this part on your approach shoes. In the forest, you will find also orange reflectors that show you the way. Basically, you follow always the same direction and ignore all side roads until you are standing on the saddle (ITAMV0416). The guidebook mentions the dry riverbed down in the valley, but at the time of my passage, the riverbed which was anything but dry because of the rain.
You descend along a narrow and steep but well-made path down to the valley, which you can see below you. You reach the asphalt, to turn left. You pass the tollbooth, to cross the river. Here you will find the Alpinegasthof “Post” (ITAMV0501).
Alpengasthof “Post”.
Tel: +49(0)8045 277
Day off: Thursday.
Bunkhouse: € 42,70, Room: € 65 + 10 including very copious breakfast from 8 am (2024). Everything OK.
Supper: a la carte to 20h: Cream Schnitzel with lettuce: € 11.90, wine 1 / 4L: € 3.80 (2010)
In the annex, where the bunkhouse is located, you have some nuisance of an occasional working compressor (cold storage room?). I found 10 mattresses, 14 pillows, and only 11 blankets. I was there alone. Plumbing and shower are OK.
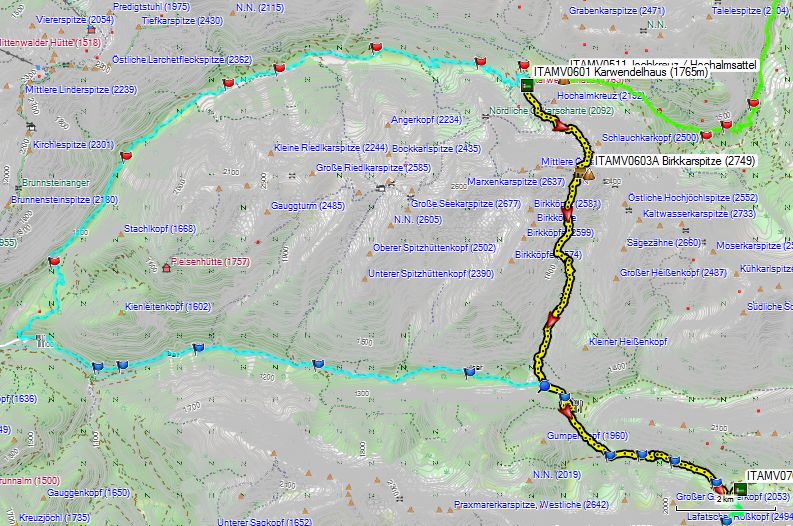
Day 5: Vorderriß – Karwendelhaus (24,8km – 6h + 1100m – 100m)

For 5.5 km, you walk along the road towards the border with Austria. You can avoid the road for 2.5 km, but then you have to climb at Voderriss towards a forest road, which still descends after 2.5 km towards the asphalt road. But, so early in the morning, the road is pretty quiet, and given the rain of the past few days I did not feel much like following a forest road, and so I took the road. Moreover, I covered this part on my approach shoes.
When the road crosses the river a second time (ITAMV0503 ), you can follow a gravel road on the left bank of the river instead of the asphalt road. The gravel road is good. You have to cover just a little more altitude difference than along the road. Once you get to Hinterriss, you find the typical little yellow signpost for walkers. When the track changes again from shore, two paths come back together (ITAMV0504). After about 2 hours you reach Hinterriss.
You follow the road and walk past the Information Centre for the Karwendel. Then you pass Gasthof ‘Zur Post’ (ITAMV0505). You walk further up to Parking 2 (ITAMV0506). Here you will find the signage towards the Karwendelhaus. Follow this road until you pass the turn-off for Parking 3. A bit further a path toward “Ahornboden” leaves the gravel road (ITAMV0507). The path continues horizontally for a long time and makes a turn to the right toward the Johannestal. When the path broadens, you suddenly find a turn-off down toward “Johannestal”. Straight ahead, I found no signpost. Given my GPS still refused service, I could not see where the path leads to. So I descended into the valley. Here you will find a bridge over the river. You reach a gravel road on the other side, which you follow to the right. To the left, you find a signpost towards “Parking 3”. A little further the road crosses the river via a bridge. Here I really started to get a first glimpse of the amount of snow that lay on the higher mountains, and it was not very reassuring.
You continue to follow the gravel road. After a few hairpin bends you will find a red signpost along the right side of the road (ITAMV0508). I followed this and that appears to be the dotted line towards the Hermann von Barth Denkmal. Higher up, the path returns towards the road (ITAMV0509), which you then follow towards the Kleiner Ahornboden (ITAMV0510). Here you turn to the right direction Karwendelhaus for walkers. What was initially a gravel road, turns into a path. From here on, I slowly reached the snow. Being in my low shoes, I transferred to the high ones. Fortunately, people had been using the path before me, so orientation was not difficult.
 Higher up you meet the road for mountain bikers again and then you reach the Hochalmsattel (1803m) (ITAMV0511 Jochkreuz / Hochalmsattel ). You can find a crucifix and a bench here. After some trudging through the snow you reach the gravel road, where at least two tracks were cleared of snow by the tires. Here go to the left until you reach the Karwendelhaus (ITAMV0601).
Karwendelhaus:

48 beds, 141 Bunkhouse beds
0043 / (0) 5313/5623
Bunkhouse: € 14 (members) (2024)
Half board: € 48 (ask at the reception) (2024)
(From 06.30u) Breakfast 2: 4 small slices of bread and condiment, asked for 2 additional slices and got them for free.
Important notice:
Given the present snow depth of more than 20 cm around the hut. And given the cabin warden declared that the Schlaugkar at 2639m was certainly covered with at least one meter of snow and given that the situation was expected to be about the same for the entire crossing of Austrian Alps until the Olpererhütte. Given his expectation that it would take at least a week before the snow was expected to melt away again, I took the decision to descend to Scharnitz to take the train to Belluno and then trying to walk back from there to as far as I could.
For the further description of the tour, I will continue this in the normal direction, even though it was executed in the opposite direction.
Day 6: Karwendelhaus – Hallerangerhaus (32,3 or 15,6km – 8h + 850 m – 800m)

From Karwendelhaus (ITAMV0601) you descend towards the first bend where you will find an indication of a path ITAMV0602) (only for pedestrians). The snow was still frozen, but it was doable to go down the path to a large hairpin bend in the road. From there, I followed a track through the snow until I got back on the gravel road. Further shortcuts I left for what they were because they were of little use and difficult to use because of the snow.
After 3 hours of walking, you reach the turn-off towards “Pleisshütte” and “Wiesenhof” (ITAMV0608).
I myself descended still a further hour to the railway station of Scharnitz (waypoint F09F), where I took the train towards Innsbruck the same day and then on to Verona. And from there either on to Padua or Castelfranco Veneto, from which you can continue towards Belluno. Cost: 63 to € 66. If you go from Scharnitz, you should buy a ticket on the train and then in Innsbruck buy tickets to Belluno or Castelfranco Veneto. The first ticket service clerk told me that I had to buy a ticket on the spot for the route Castelfranco Veneto. The second time I started in Seefeld and bought my ticket for the full trip towards Belluno.
In Scharnitz, hotel accommodation is expensive and sought after. Hence on my return to the Karwendel from Belluno, I took the train to Seefeld, where I was served much cheaper than in Scharnitz. And due to the fact that I had to wait five nights for my transit to Belluno, that was considered good.
The turn-off “Pleisshütte” and “Wiesenhof” (ITAMV0608) is the right direction for the Hallerangerhaus. You have approximately 100m in additional climbing but you cut short in distance. Otherwise, you have to descend approximately the same 100m to rise it again subsequently.
At the Wiesenhof (ITAMV0609) you can eat or drink something, but you can’t stay overnight.
From the Wiesenhof, climb a bit towards the Gleirschhöhe (ITAMV0610), where you have a beautiful view over the River Inn. At waypoint ITAMV0611, you reach the turn-off to the Pleisshütte.
Those who cannot follow the normal way over the Schlauchkarsattel and haven’t booked in Hallerangerhaus may consider redirecting towards the direction of the Pleisshütte. The road is a little shorter, but the Pleisshutte itself is about 200m higher than the Hallerangerhaus. At waypoint ITAMV0706 or 11, you can return back to the normal route.
I myself had high hopes to take the Schlauchkarsattel, that’s why I went on the Hallerangerhaus. However, these hopes were roughly crushed by the Huttenwirt of Hallerangerhaus, which made me aware of the deteriorating weather and drew my attention to the presence of snow, along the north side of the Schlauchkarsattel. And considering I had already done so much, I did not want to take the risk and descended the same day of my arrival in the Hallerangerhaus towards Scharnitz.
At waypoint ITAMV0613 you can find a protected area with sources, which is considered the source of the River Inn. The water is incredibly clear.
Until waypoint ITAMV0616 at the Kastenalm (1220m), the road climbs very moderately and is therefore widely used by cyclists. Beyond this point, the road climbs firmly up towards waypoint ITAMV0617 (1550m) after which the increase in altitude becomes more moderately until you reach the Hallerangerhaus (waypoint G01).
Hallerangerhaus:
I didn’ stay overnight at this cabin, considering the weather forecast, but went down towards Scharnitz.
26 beds 70 in a bunkhouse.
Hut: 0043/(0)720/34.70.28
Mobile: 0043/(0)664/893.75.83
Bunkhouse: € 14 (members) (2024)
Half board: € 48 (ask at the reception) (2024)
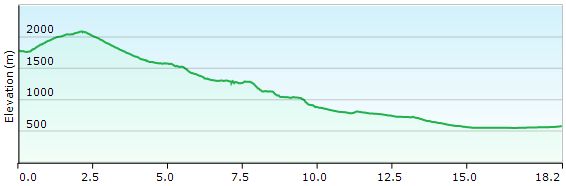
Day 7: Hallerangerhaus – Wattens (18,2 km – 4h + 350m – 1550m)
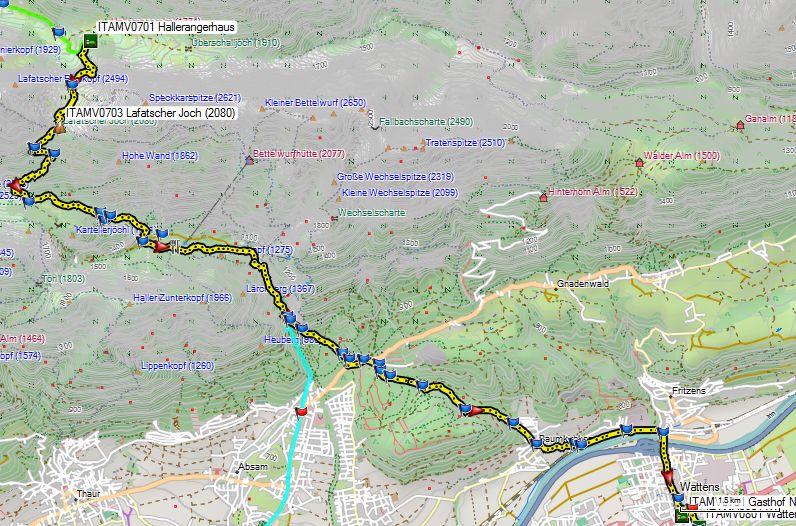

 At the Hallerangerhaus (waypoint ITAMV0701) turn right and walk horizontally up the rubble slope. Here you go up in a zigzag over all kinds of gravel, from fine to coarse. Once you are out of this rubble funnel, you come to a slope with a mixture of plate and small rocks. When at waypoint ITAMV0702, you are at the end of the slope and then it goes up slowly to the highest point, the Laffatscher Joch (ITAMV0703). The descent I experienced in the ascent to be very difficult for the feet. You expect in such a wide path not so much gravel, and it is seeking the places with the lowest amount of loose gravel for somewhat pleasant walking. In the bowl, you will find the signpost (ITAMV0706). You turn left here, going through a fairly swampy area. The descent that follows is also pretty soggy. You should be careful not to slip (ITAMV0707, 08 & 09). It is worth considering to descend straight to St Magdalena Haus (direction ITAMV0711), through the Issjöchl. Possibly that path is more pleasant.
I myself didn’t follow the path passing along the St-Magdalena Haus because I was walking on my low shoes and therefore chose to walk on the asphalt (ITAMV0711).
At waypoint ITAMV0712, you leave the asphalt for a good gravel road through the forest. At waypoint ITAMV0716 you’ll return on the asphalt for a little while. It’s amazingly busy. When at waypoint ITAMV0717, you leave the busiest road to the right for a smaller road. Follow it until the first forest gravel road, where you leave the asphalt (ITAMV0718). From here on, you always follow the same direction through the woods, at first almost horizontal, later stronger descending along a brook, until you reach the asphalt on the outskirts of the village Baumkirchen (ITAMV0723). You descend along the asphalt until the town hall (ITAMV0724 ). Here you turn left in front of it, to turn right a little further, going down along the Dorfstrasse (ITAMV0725). At waypoint ITAMV0726 you pass under the railroad track to find the Auweg at waypoint ITAMV0727, where you can follow a quiet road along the railway track. At waypoint ITAMV0729 you reach the main road to Wattens. Follow the sidewalk at the left side of the road, across the Inn and the motorway towards Wattens Center. At the roundabout, you will find a Lidl on the left. Along the main road, you will find a department store with a broader range of products. In the city center, you can find all kinds of businesses.
At waypoint ITAMV0731 you will find Gasthof Neuwirt (no website or email to be found, just phone 0043 (0) 5224/52260 Fax 0043 (0) 5224/55115), which certainly is worth considering, given the Wattenerhof was disappointing to me. At Gasthof Zum Golden Adler (waypoint ITAMV0732), they were renovating thoroughly. From Neuwirt go left to Zum Adler Golden and then you turn right to the Wattenerhof (ITAMV0801).
Wattenerhof (probably closed):
Lange Gasse 20-21, Wattens
0043 (0) 5224/52435
Alternativs on Booking, Preiswert-uebernachten.de of Airbnb.
Pension Clara, Salzburger Str. 6a, 6112 Wattens from 70€ (2024)
3km away from the route:
Gästehaus Pension Edelweiss, Mühlbach 5, 6114 Kolsass, Oostenrijk, from 57€ (2024)
Day 8: Wattens – Lizumer Hütte (16,1km) – Geislerhof (Vorderlanersbach) (24,9km – 8u + 1840m – 760m):
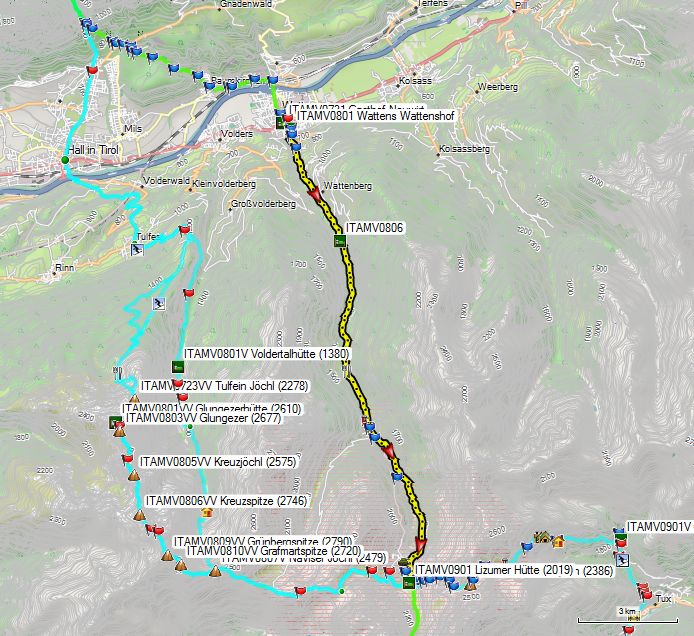
From the Wattenerhof (ITAMV0801) on, you walk up to the point of the street, where it makes a sharp turn to the left. Here you will find a Calvary (ITAMV0802), where you are lead along a path back towards the road at waypoint ITAMV0803. When at waypoint ITAMV0806, you pass the turn-off for Wirtshaus Säge. According to the information on the signpost, one would be able to sleep here. At waypoint ITAMV0807 you pass Gasthof Haneburger. I do not think you can spend the night here.
When at waypoint ITAMV0808, you reach the entrance to the military training grounds. During the month of September, there is shooting practice here. It is therefore not advisable to use the alpine variant towards the Lizumer Hut during that month, because you enter the military zone without knowing in which zone the shooting practice will occur, unless you inform yourself by calling 0043 / (0) 664 / 6625500, 5400 or 5530 or via the internet at www.wattenberg.tirol.gv.at (Freizeit und Turismus/Truppenübungsplatz).
The military site is divided into four zones, two of which are used in each case. This changes every day. This is referred to in notes for the next few days, located in a box to the left of the barrier. There is also a schematic map of the four zones and flashing lights in the areas which will be used for shooting practice on that day. The risk, therefore, exists that you will have to wait one day to reach the Lizumer hut until there is no longer shooting practice in Sector 3, in which the Pluderling Sattel lies. The Torjoch lies on the boundary of sectors 1 and 2. On the day of my passage, there was shooting practice in zones 2 and 3, but if you come from the other side, you miss that information.
From waypoint ITAMV0810 on, the road surface changes into gravel. There is a road sign indicating a gradient of 30%. The road is in good condition, considering it’s regularly maintained by a steamroller. From waypoint ITAMV0811 on, the gradient decreases. At waypoint ITAMV0812 you can find the new military buildings. At waypoint ITAMV0814 you reach the Lizumer Hut.
The Lizumer Hut has a good reputation on the site of www.muenchen-venedig.de .
I myself did not spend the night here and nor did I eat here.
Lizumer Hut
Lizum 105
A-6113 Wattenberg
Tel.: +43 664 9272117
E-Mail: info@lizumerhuette.at
40 beds and 40 bunkbeds. Open: mid-June to mid-October
No recent price list online! 😦
Anyone who follows the normal route stays here overnight to continue the next day to the Tuxer-Joch-Haus (waypoint J01).
I myself was caught by surprise by a substantial amount of snow the night before (20 cm around the hut) at the Spannagelhaus at an altitude of 2531m. Given that both the Pluderling Sattel (2743m) and the Gschützspitze Sattel (2657m) are fairly technical passages, I was advised by the Huttenwirt of the Spannagelhaus to stay in the Geislerhof (1625m Vorderlanersbach) to continue the following day to the Lizumer Hut over the Torjoch (2400m). This passage has no technical difficulties and was virtually free of snow the next day.
At the Lizumer hut, there is a signpost with just about every possible direction, including one to Venice (20 days ;-)). The beginning of the trail (ITAMV0815) in the direction of the Torjoch, isn’t very clear. The paint marks in the military area were not very fresh anymore. However, once you’ve found the right path, the orientation is trouble-free. The pass is so flat that there isn’t really a highest point (ITAMV0822). You just keep walking at more or less the same height for a longer time. At the end of the plateau, you can see the Torsee and a small hut. The path passes in front of this cabin (ITAMV0826). A little further you pass the border of the military region (ITAMV0827). You descend along a mountain stream/waterfall (ITAMV0828). And then you pass an electric fence for livestock, with no specific facilities for pedestrians. Below you will find an Almhut and stables (waypoint ITAMV0829, 30 & 31). Over here it is quite muddy because of the cows. The path slaloms between the buildings to arrive at a gravel road. You leave this road almost immediately for a path to the main building of a bigger farm with a variety of buildings (ITAMV0833). Again, you reach an electric fence with no amenities for walkers.
From here you walk along the gravel road in the direction of the Geislerhof (ITAMV0901).
Geislerhof:
(1625m Vorderlanersbach)
9 two-bed bedrooms, three with bunk beds. Bathroom on the floor.
Tel: 00 43 / (0) 5287/87657
Half board: no recent pricelist online! 😦
Dinner: soup, Wienerschnitzel, french fries, salad and ice cream
Breakfast: very large buffet.
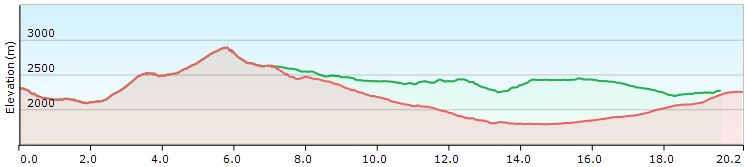
Day 9: Lizumer Hütte – Tuxer-Joch-Haus (12km pas) / Geislerhof (Vorderlanersbach) – Tuxer-Joch-Haus (23,8km – 6u + 1270m – 360m):


Note: At the moment when this hike was made, the Spannagelhaus was still used as a normal mountain hut, with the possibility of overnight stay. Sadly, the ski-industry has decided that there is more money to be made by serving food and drinks to skiers, then to offer lodging to summer hikers. Therefore, the hut was bought in 2013 by the Zillertaler Gletscherbahn. At this moment, only the restaurant is open to the public. Therfore, only the Tuxer-Joch-Haus can be used for overnight stay, during the summer season. As a result, you will have to stop here for the night or continue to the Olpererhütte or the Friesenberghaus.
From the Geislerhof (ITAMV0901V) you descend along the tar road until you reach the main road.But you can also descend through the flank of the hill, which is both shorter and nicer. Therefor you take the gravelroad in between 2 buildings. You leave this road in a curb (ITAMV0902V).
You follow a path parralel to a powerline, until you reach a gravel road. For a short while you follow this road to the right, until you can descend towards the Eggalm Nord skilift (ITAMV0905V).
Here, you will find a path that descends in northwesternly direction, towards the base station of the Eggalmbahn. You cross the Lahnbach (ITAMV0909V), to reach the center of Lahnersbach (ITAMV0909V). At the end of the village, you reach the L6 (ITAMV0910V), which you follow to the left (south) untill you reach Hintertux (ITAMV0911V) after 6km.
Just before the end of the village, you take right. In a curb, the road turns into a gravelroad. You paas through a skitunnel after which you leave the road to follow a bath in the direction of a small number of trees. Just before it , you turn left.You arrive at a gravelroad which turns into a path at a second bunch of trees. Slowly you approach the Weitentalbach. At a crossroad (ITAMV0912V) a bit further on, you can choose between a path along the river and a gravel road a bit further away from the river. Both come together at the Schleierfall (waterfall). You continue along the river untill you reach an crossroad (ITAMV0905), where you join the normal rout along the Geierjoch and the Geschützspitzsattel. You continue upstream untill you cross the riverbed, to contiunue climbing towards the Tuxer-Joch Haus (ITAMV1001).
Tuxer-Joch-Haus:
Property of the OTK (the Austrian Tourist Club)
35 Beds
Dormitory (Members of a mountain association): 12,50€ (2024)
Half board: 40€ (2024)
Shower available
Open: end of June till the end of September
Spannagelhaus:

Note:
In 2013 the Spannagelhaus was sold to the Zillertaler Gletscherbahn. At this moment, the hut is only a restaurant. You will have to continue towards the Olpererhütte (turn off: GPS ITAMV1021) or the Friesenberghaus (ITAMV1024).
Day 10: Tuxer-Joch-Haus – Pfitscher Joch-Haus (Rif Passo Vizze.) (20,2 km – 5h +880m – 770m)

 You go right next to the hut (ITAMV1001) where you don’t take the gravel road to the lift station, but the path left of it towards the Friesenbergscharte. You descend a bit towards a bridge (ITAMV1003) and then you continue shortly at the same level towards the fork with a path to the cable car station (ITAMV1007). From here the path goes up. The trajectory is erratic and no longer corresponds to the digital map. I have included here a lot of extra points so that you could make this traject in all weather conditions. In normal conditions (without fresh snow so) you’ll find here some snow between the rocks in the upper part. This is no longer a “Kees” or glacier in the literal sense of the word. The snow in between the stones can be hard and slippery, but you can’t slide very far because the slope gradient is very limited.
The other side is completely the opposite. This is almost a wall. The Friesenbergscharte (ITAMV1020) itself is a small place. I was here in beautiful, sunny and relatively warm weather, and out of the wind and so I remained here sitting for half an hour. The first part of the descent is secured with steel cables and in bad weather conditions, this is certainly necessary. To the lake below you, you are always in steep terrain and until you reach the cabin, you see nothing but rock.
Unless you are planning to sleep at the Olpererhütte (turn-off waypoint ITAMV1021, I would descend to the Friesenberghaus (ITAMV1024) and hence to the Dominikushütte (ITAMV1030). This route is easier and descends more gradually than the one towards the Olpererhütte.
At the height of the Dominikushütte (ITAMV1030) descend to the parking lot, which you follow to the right. At the end of it, you cross a bridge and then pass next to a souvenir shop (ITAMV1031) and continue into the valley, parallel to the river towards Pfitscherjochhaus.
This path is wide and climbs gradually towards waypoint ITAMV1034. Along the way, you have another hut where you can have a drink, situated somewhat above the normal route. From waypoint ITAMV1034 on, you climb more steeply up towards the pass. You can choose between the gravel road, which is longer and the path that rises more firmly.
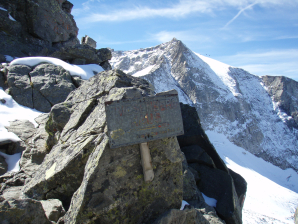
Above, you first see the customs hut (ITAMV1035). The Pfitscher Joch-Haus (ITAMV1101) is situated somewhat further behind the customs hut.
Pfitscher Joch-Haus ( Rif Passo Vizze.) :
office@pfitscherjochhaus.com
0039/0472.630.119
30 beds, laundry dryer, and spinner freely available.
Overnight stay with large breakfast buffet and shower: no recent price list online! 😦
Day 11: Pfitscher Joch-Haus (Rif Passo di Vizze) – Weitental (25,4km – 8u +920 m – 2300 m)
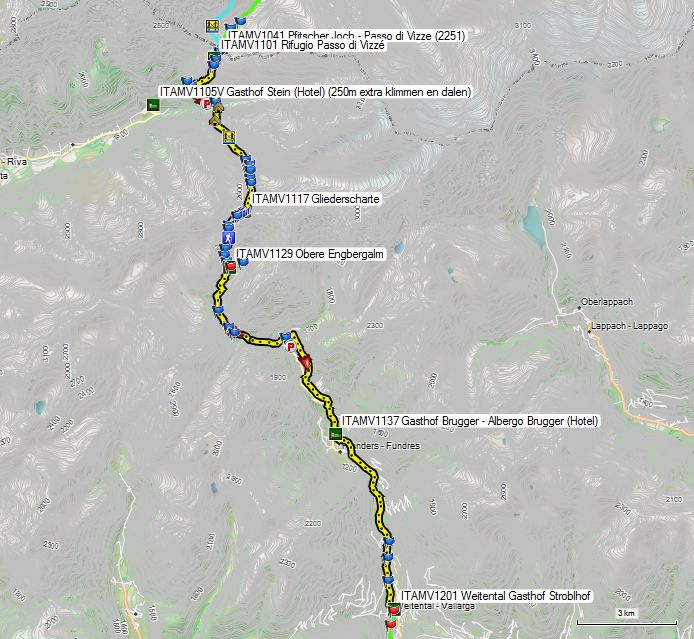

When you leave the cabin (ITAMV1101), turn left around the hut, where you’ll find a path that descends to the lake (ITAMV1102). From there it goes along the casemates always downhill. You hit the road. Cross it (ITAMV1103) and descend further. The first part is fairly gradual, but once you reach the treeline, it goes downhill steeply. You hit the road (ITAMV1104) one more time. Here you go a little bit to the right, to find the path again for the last shortcut. When you reach the road (ITAMV1105) the next time, you follow it to the left towards a hairpin bend (ITAMV1106).
Here you will find a path and an advertisement for the Hochfeiler Hut. You follow the path until you reach a junction, where you turn right (ITAMV1107). You continue towards a bridge over the river, to arrive at a pasture with a hut (ITAMV1108). You follow the path through the pasture and a little bit higher in a rather slippery section, you take a turn to the right in the direction of the Gliederscharte. You pass the Unterberg huts (ITAMV1109), which are in a state of decline. From there on, the path becomes narrow and will lead often through long grass. First, you go down a bit to a bridge (ITAMV1110) over the Unterberg Bach (river). From here on, it goes uphill towards the Gliederscharte (ITAMV1117).
Between waypoints ITAMV1112 and 15, the course of the path is rather erratic. Because of the long grass and the fact that the path is fairly narrow, you really have to pay attention here. This is typical for a path that doesn’t lead to a cabin. If no money is to be made from selling food or drinks, the interest to maintain a path well is often much less.
At waypoint ITAMV1116 you find a turn-off to the Hochfeiler Hut. The course of this path I could not follow in the landscape. From here on, the slope is very steep and you have to watch out to avoid falling, because of the long vegetation and the fact that the path is very narrow. Use your sticks. Higher up, you enter the rubble area. Here you will find traces of an attempt to build the path and protect it against outwash of the gravel on the path by placing wooden logs. A lot of this is washed away anyway. From here on, it goes smoothly up towards the Gliederscharte (ITAMV1117).
 Strangely, there are only signs to be found in the direction from which you come, but not in the direction in which you need to go. You will also search in vain here for painted signs because they end at the Griederscharte.
You’ll find cairns, however, usually with a white stone on top. Those with a trained eye, won’t have too much trouble following the path, but for safety reasons, I have logged many waypoints in the upper part of the path.
At waypoint ITAMV1123 the path changes direction, to turn in the direction of the spillover of the lake, where the stream is crossed. On the other side, you’ll find red-white signs (ITAMV1124 waypoint), which you follow to the left and therefore downhill. From here on, it goes smoothly towards the Upper Engbergalm (ITAMV1128 ). Here you can eat and drink. Overnight stay only in emergency cases. 6 simple bunk beds, no comfort.
Under the hut, the gravel road makes a hairpin bend at waypoint ITAMV1129, where you cross the river over a narrow emergency footbridge. From here on, you follow the gravel road further down the valley.
At the Untere Engbergalm, major renovation work was undertaken in 2010.
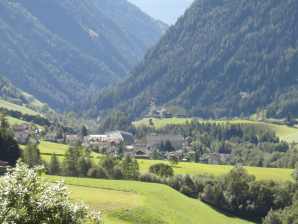 Somewhat lower (ITAMV1130), you cross the river and continue to descend further to the left. At a striking rock, you will find signposts (ITAMV1131). A bit lower you’ll find a bridge, where you cross the river again (ITAMV1132). From here on, it goes down towards the gorge, where the descent angle is greater and the road is paved with concrete to accommodate the use of tractors with lorries for cows. At waypoint ITAMV1133, you reach the asphalt road. I myself descended along the asphalt to waypoint ITAMV1136. You can leave the road at waypoint ITAMV1135, but that part is less pleasant. At waypoint ITAMV1137, you reach the asphalt again, which you follow to the “center” of Weitental (waypoint ITAMV1138 ).
Gashof Stroblhof you will find waypoint ITAMV1201.
Gashof Stroblhof:
Tel: 0039/0472.54.81.19
Room with half board 45 € !? (2024)
Do not expect culinary delights, but other than that there is nothing negative to be said about the food. Ample breakfast buffet. Good room, with modern plumbing.
Day 12: Weitental – Peitlerscharte / Rifugio Genova (40 km – 14u +2200m – 725m)
I must note that I did this traject in the opposite direction in 12 hours. That was just feasible. Whether this is possible in the normal direction is questionable. In this direction, an overnight stay at the Kreuzwiesen-Hut is wise.
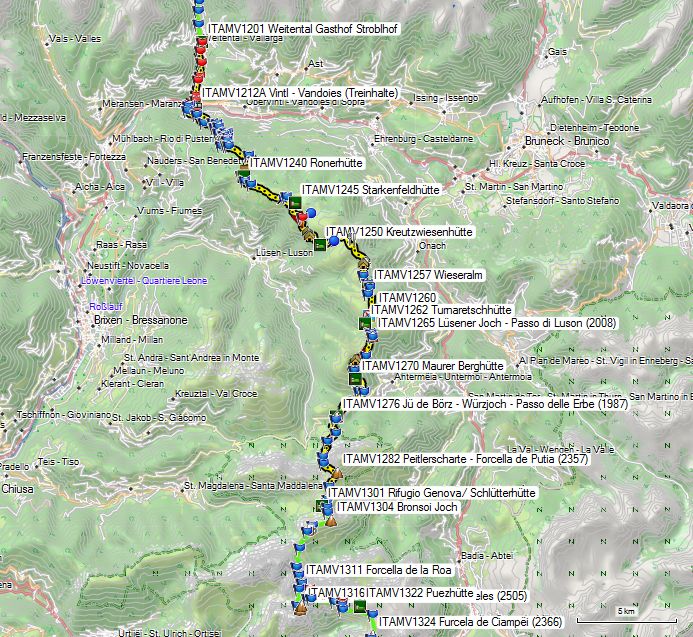
From Weitental ( ITAMV1202) descend toward Niedervintl on the right bank of the Rio di Fundres, and this through a combination of road and forest road. At waypoint ITAMV1208, you change riverbank in order to further descend towards Niedervintl. At waypoint ITAMV1210 you reach the road, which you leave soon, through the village center of Niedervintl ( ITAMV1211). Those who want to shop, better keep following the main road, because then you pass a grocery store (small self-service).
In Niedervintl there is no suitable accommodation available other than a four-star hotel located along the main road.
At waypoint ITAMV1212 you return to the road coming from Dun. Just before it joins the SS49, you turn right ( ITAMV1213) and pass under the SS49 and the railway track. Then you cross the river, where you turn to the left ( ITAMV1215). At waypoint ITAMV1216, you find the beginning of the real path 14.
This traject has a very peculiar and confusing course, where you have to pay attention to signposts and paint marks. The matter is further complicated by the fact that this path in its middle section was widened in view of forestry in 2010.
Again I logged a lot of waypoints to facilitate orientation. Once at waypoint ITAMV1240, you find the Roner Refuge, where you can eat and drink something. The rest of the road is more comfortable and follows largely through good dirt roads. From here on, I walked on low shoes until the end of the gravel road past the Würzjoch (on hiking boots only, you don’t walk such distances).
At waypoint ITAMV1243, you can turn to the right for the shortest way to the Kreuzwiesenhütte. Because of unclear indications, I walked along the slightly higher route. Here you pass the Starkenfeldhütte ( ITAMV1245 ), where you can eat and sleep. At waypoint L46, you will find the first signpost to the Jakobsstöckl ( ITAMV1254). However, the normal route passes over the Kreuzwiesenhütte ( ITAMV1249). Before you reach it, you pass along two more huts ( ITAMV1247 & 48), where you can drink something.
The Kreuzwiesenhütte ( ITAMV1249) has a fairly commercial atmosphere and seems to focus on day trippers (which is why I continued towards Gashof Stroblhof.)
Kreuzwiesenhütte:
Flittnerstrasse 11, 39040 Lüsen, Südtirol/Italien
info@kreuzwiesenalm.com
Tel: 0039/0472/413 714
Tel: 0039/333 / 748.48.80
Bunkbed with breakfast: 39 to 42€ (2024)
Double Room: 79€
From Kreuzwiesenhütte ( ITAMV1249) continue your way along the gravel road until the first hairpin bend. Here you will find a further indication to the Jakobsstöckl (54). This is the normal route. Due to the lack of good indications from the opposite direction, I followed the lower route via waypoint ITAMV1251 through 53.
At waypoint ITAMV1254 you return back to the normal route. Shortly after the cabin, you cross a stream and then the path continues in between the trees until you reach a pasture. Here, the trail fades somewhat. You walk towards a small hut ( ITAMV1255) and then towards a chapel ( ITAMV1256). Here you turn to the right and continue along a heavily eroded road uphill. The nature of the road changes rapidly to a road between the meadows. At waypoint ITAMV1257, you pass a pasture gate after which the road fades away. The road descends down towards the Wieser alpine hut ( ITAMV1259), where you can eat or drink something again. At the hut, you reach an access road, which is better and which you very briefly follow to the left, to leave it again a bit further to the right (ITAMV1260). Here, the trail makes a wide curve at the foot of the slope. After a hairpin bend ( ITAMV1261), the climb begins. At waypoint ITAMV1262, you are just about at altitude, after which the path remains at about the same height towards the Lago di Rina (Glittnersee). This ‘lake’ is more a sort of large pond, where a swan and two ducks live. From here on, it goes downhill along a vague path to the Turnaretschhütte ( ITAMV1263) The cabin was closed at the time I passed here in 2010. Website not active. No overnight stay possible. Exact condition unclear.
Here you continue to the left until you reach a fork of gravel roads at waypoint L64. If you see a wooden fence ( ITAMV1265), you leave the gravel road to the right, to walk along this fence quite steeply downhill to the Lüsner Joch ( ITAMV1266). Here you go straight along the gravel road (not through the meadow). A bit further, you find a turn-off to the right, indicated by a signpost ( ITAMV1267).
Follow the gravel road which turns into a path. At waypoint ITAMV1268, you’ll find a path into the valley. You now continue to climb towards a cabin ( ITAMV1269). From here on, the path remains more or less at the same level until you reach a bifurcation at waypoint ITAMV1270. Here you will descend to the left towards the Maurer Berghütte (ITAMV1271).
Maurer Berghütte (GPS L70):
Tel.: 0039 0474/520059,
0039/340/7752314 (Mobil)
Beginning of June until mid-October, 20 beds.
According to the information panel along the way, you can sleep in a dorm or room with breakfast. The cabin looks smart. No actual price list online!
From here you on, you can find gravel road with abundant signs that point the way to the parking lot at the road SP29 ( ITAMV1275).
Follow the road to the right uphill for 1.2 km to the Utia de Börz (Würzjoch) ( ITAMV1276). You will find the Würzjochhaus here, where you can eat and drink something and sleep (pricey).
Ütia de Börz – Würzjochhütte (WN03901):
39030 San Martin de Tor – San Martino In Badia – St. Martin In Thurn
Tel: 0039 474 52 00 66
Overnight fee with Half Board: 65€ (2017)
(currently different owners, not very transparent prices…) (If your condition is good, it is better to continue to the Rifugio Genova)
Shower: included (unlimited)
Breakfast (buffet from 7h, coffee, and tea from ard. 7h15’):
literally everything and unlimited: brown and white buns, muesli, cornflakes, fruit, yogurt, cheese, meat, fish, egg, marmalade, Nutella, butter, honing, coffee, or tea, juice.
Just beyond the parking lot along the left side of the road, leaving the asphalt. You run initially on a flat gravel road past a hut ( ITAMV1277) direction mountainside (ITAMV1279), where the road turns into a path. The path climbs slowly into the flank to waypoint ITAMV1280, from where it descends to a fork in the river bed ( ITAMV1281). Here you climb along the river to the Peitlerscharte ( ITAMV1282 ). Beyond the Peitlerscharte, the path goes slightly downhill to the Schlütterhütte / Rifugio Genova (ITAMV1301).
Schlütterhütte / Rifugio Genova:
Cell: +39 3513465666
Hut: +39 0171 978138
Beds: 30 Bunkbeds: 40 Busy hut, because of mountain bikers and the Via Feratta on the Peitlertkofel . (Reservations are recommended)
Half board: 48€ (members)
Shower 5 ‘
(Cheap hut 🙂 )
Day 13: Peitlerscharte / Rifugio Genova – Pisciaduhütte / Rifugio Cavazza Franco (21,1km – 10h30′ +1450m -1200 m)


Technically a difficult stage may be split with a night at the Puezhütte.
You’ll leave the hut (ITAMV1301) via a road that runs to the right, of the one over which you approached the cabin yesterday. The cabin quickly disappears out of sight (ITAMV1302). The climb to the Bronsoi-Joch (ITAMV1304) is hassle-free.
From the Bronsoi-Joch descend towards the Alpe Medalges, a hut (Tel .: 0039/347/5049169 (Mobil) ( www.medalges.com .) (ITAMV1306), where you can eat and drink something. You descend a bit further to the Kreutz Joch (Forcella San Zeno) (ITAMV1307).
From here, it goes at first relatively flat and then slightly uphill to waypoint ITAMV1310.
From here on, you climb along a path in a gravel slope to the Forcella de la Roa (ITAMV1311).
From here on, there are two possibilities:
- Either follow the guide and you go over the Forcella Nivea (Nives) / Nives On-site, this path is referred to as being a Via Ferrata. According to the German guide, this consists solely of a ladder of 4m height, through a narrow gully, where there is a risk of falling rubble. At the foot of the gully, you will possibly find a snowy field at the beginning of the season (no snow seen in September). Higher up you will find a cable secured passage with slightly difficult passages. In total, you conquer 100 vertical meters in 40 ‘. According to the guide, you don’t need any climbing technic other than a solid walking technic.
In the opposite direction, only a Via Ferrata to the Forcella de la Roa and nowhere the Forcella Nivea is mentioned. Hence, I was not sure of the route and I opted for the low route (see under 2), also discussed in the Rother guide ).
- You descend from the Forcella de la Roa to the right in the direction of the Regensburger Hut. When at waypoint ITAMV1312, you will find the junction with the path of the Forcella Nivea. When at waypoint ITAMV1313, you will find a junction where you turn left along a path in coarse scree. This part is very unpleasant to walk until you reach the Forcella Forces de Siëlles. At waypoint ITAMV1314, you can find another path to the Regensburger Hut. You continue to climb to the saddle (ITAMV1315). From the saddle, climb up along a secured stretch of the path via a short cable to the highest point (ITAMV1316). Until waypoint ITAMV1317, you continue in the flank, after which you descend until waypoint After this follows a relatively flat part to waypoint ITAMV1319, where the two variants get back together.
From waypoint ITAMV1319, it goes smoothly until the Puezhütte (ITAMV1322).
 Puezhütte:
Tel: 0039/0474/646427
rifugiopuez@yahoo.it
CAI, mid-June to mid October, bunkbeds: 90 Overnight fee: 15€ (2024)
Website not functional!
From Puezhütte (ITAMV1322), the path rises gently in the slope. Subsequently, the path remains at the level and then drops altitude going through a narrow gorge to a saddle and a node of paths (ITAMV1323), where you can go left descending into the valley. You continue however straight on, to stay at the same level.
At waypoint ITAMV1323, you reach the Forcella di Campiglio / Ciampa-Joch. Again, where you continue your way in the same direction. At waypoint M24, you find a high variant in the direction of the Crespeina-Joch. At waypoint ITAMV1326 you have reached the Crespeina-Joch. At waypoint ITAMV1327, you will find another junction. Here you have to follow the path left in the side of the mountain. The indicated direction is unclear to me.
When at waypoint ITAMV1329, you’re at the Cir-Joch. From here you have to pay attention to the paint marks because there are many smaller unmarked paths between the different rock towers. The landscape is very photogenic. The main trail is made remarkably good. It’s obvious that you’re here within the borders of a national park.
At waypoint ITAMV1330, you can find the beginning (or end of the path) and this near Rifugio Jimmy (ITAMV1331), near a cable car, which was in operation. Follow the gravel road down the valley towards the Passo Gardena.
When at waypoint ITAMV1332, you will find a path that cuts short the bends in the gravel road. At waypoint ITAMV1334, you reach the main road at the Gardena Pass / Passo Gardena.
Grödner Joch/Passo Gardena:
Berghaus Frara, Grödner Joch/Passo Gardena (ITAMV1335)
Tel: 0039/0471/79.52.25
24 Bunk beds, Rooms
Bunkbed with breakfast: 62€ (2024)
Double Room with breakfast 139 or 172€ (2024)
Hotel Cir, Gardena Pass / Passo Gardena:
Single Room: 150€!!!! (Aimed at long stay)
Tel: 0039/0471 / 79.51.27
Once at the asphalt, you go right. Just past the hotel, gift shop and the coach parking lot, you turn left towards the Pisciaduhütte / Rifugio Cavazza Franco. (ITAMV1335)
First, the path goes up against the wall and then drops it in the direction of Vall Setus.
Both at waypoints ITAMV1336 and 37, you will find turn-offs to the Via Ferrata. You can find a description of the Pisciadu Via Ferrata here.
When I got into the Pisciadu Hut, it just started to rain. During the night it snowed lightly so that even snow stuck to the securing cable on the normal access route. That’s why I did not check out the Via Ferrata. My Via Ferrata gear had indeed been sent home by post.
At first, the path is situated at the west side of the Vall Setus. At a snowfield, you going to zig-zag through a zone with stone debris. Eventually, you arrive at the beginning of the secured passage on the eastern wall of the Vall Setus.
 Fix your hiking poles on your backpack and pull on your Via Ferrata gloves. This is the only secured route known to me, where one-way traffic was introduced. This has the advantage that you have less chance of rubble falling down on you from other hikers. Unless you plan to head towards the Boèhütte on the same day, it makes no sense to take your walking sticks from your backpack at the end of the secured passage (ITAMV1338), because you are very close to the hut. In the Vall Setus, you notice the cable of the material funicular towards the Pisciaduhütte / Rifugio Cavazza Franco (ITAMV1401).
Pisciaduhütte / Rifugio Cavazza Franco:

T: +39 0471 836 292 –
M: +39 335 60 96 141 –
Rooms: 70, Bunkbeds: 100
Bunkhouse: 18,50€ (2024) (members)
Half board in the Bunkhouse: 60€ (2024) (member)
Half board in a room: 67€ (2024) (member)
Shower: price?
Day 14: Pisciaduhütte / Rifugio Cavazza Franco – Rifugio Fredarola. (9,6km – 4h + 650m -800m)


 From the hut (ITAMV1401) you descend towards the lake (ITAMV1402). You round it along the side of the dam and continue to the right into the valley. The path is clearly visible on the flank.
On this stretch, you will find three cable secured sections. The path climbs to the left towards a bowl and then through the bowl in the direction of an in-between saddle (ITAMV1403) to continue climbing towards the Bamberger Sattel (ITAMV1404).
 Then it goes downhill towards the Zwischenkofelsattel (ITAMV1405) and then back up over the Zwischenkofel (ITAMV1406 & 07) to continue descending (ITAMV1408) towards the Boèhütte (ITAMV1409).
Boèhütte:

Tel: 0039/0471 / 84.73.03
Beds: 38 Bunkbeds: 31
No recent price list online! 😦
Beyond the hut (ITAMV1409), the path goes diagonally to the left and then in the side up, to continue over the plateau. Here you need to follow wooden sticks, which protrude approximately 2m over the landscape.
Between waypoint ITAMV1410 and 11, I found finding the correct traject confusing because they had put out signs. So I have orientated myself based on the sticks. From waypoint ITAMV1411, you descend into the flank until you reach waypoint ITAMV1412, where you make a striking change of direction of 90 ° towards the Rifugio Forcella Pordoi (waypoint ITAMV1413 ).
Rifugio Forcella Pordoi:
Tel: 0039/368 / 355.75.05
Tel: 0039/0462 / 76.75.00
Beds: 16
Half board: 70€ incl shower (Expensive!)
From the hut (ITAMV1413) you descend by a large rubble field. Sometimes the official path is difficult to distinguish from the shortcuts. If you always choose the least steep descent, you’ll find the official path, but you’ll be looking almost in vain for painted waymarks.
The amount of gravel is enormous, making that you will slide much in the gravel. At waypoint ITAMV1414 you will find a signpost.
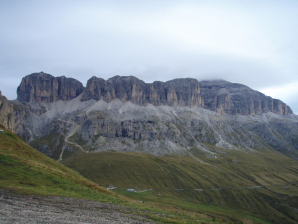 In the lower part of the descent, where the ground is covered by grass, the path paved with gravel and stairsteps have been constructed using wooden beams. The descent is not really enjoyable, but if you notice how fast the mud sticks to your shoes, you accept the inconvenience of the gravel here.
On the other side of the road (ITAMV1415) you will find a wide road, which climbs. The substrate is typically gravel, but in the parts where this is not the case, you will also mark the great adhesive strength of the mud.
At waypoint ITAMV1417 you reach the saddle. After a short nearly horizontal stretch, you reach the Rifugio Fredarola (ITAMV1501).
Rifugio Fredarola:

Tel: 0039/462 / 60.20.72
Cell: 0039/335 5654072
Heated rooms (opportunity to wash and dry your clothes (magnificent views)
Very copious breakfast.
No price indication on the website!!! Mainly aimed at wealthy ski tourists. Maybe that’s why it’s still affordable in the summer!?
Day 15: Rifugio Fredarola – Alleghe (25,4km – 6u +50 m -1600m)


From the Rifugio Fredarola (ITAMV1501) the path goes uphill passing along waypoint O02 towards the Rifugio Viel Dal Pan (ITAMV1503).
Rifugio Viel Dal Pan:
Tel: 0039/0462 / 60.13.23
Tel: +39.339.3865241
E-mail: info@rifugiovieldalpan.com
Website does not mention prices!!!
Then the path continues into the flank, in light decline towards waypoint ITAMV1504. From here on, you descend towards the Rifugio Marmolada and the Lago di Fedaia. The path becomes significantly narrower. At the Rifugio Marmolada (ITAMV1506), you reach the asphalt again.
Rifugio Marmolada:
Tel: 0039/0462 / 60.16.82
Half board in the bunkhouse: 55 to 61€ (2024)
Half board in a room: 68 to 74€ (2024)
Private: expensive!
Rooms: 13 Bunkbeds: 25 (negative comments on www.muenchenvenedig.de)
You cross a dam (ITAMV1507) and continue along that side of the lake shore to the end of it, reaching the Passo di Feddaia and the Rifugi Passo Fedaia (ITAMV1508).
Rifugi Passo Fedaia:
Località Passo Fedaia 1
32020 Rocca Pietore
Belluno
Tel: 0039 / (0) 437/722007
Beds: 23
Bed and breakfast: € 30 (bunkbed) to € 60 (room with breakfast) (2024)
Room in half board: € 85
Private: expensive!
From the Passo Fedaia (ITAMV1508), the path or lack of it is a very sad situation. When I was there, there was fog and a drizzle, which didn’t improve the situation. I walked along the road from the Rifugio Cap Bill (ITAMV1509) until the second ski lift. From here on, there is a more or less useful trail under the ski lift between waypoints ITAMV1510 and 11. Then you’ll have to return back to the road until the Malga Ciapela. Beyond the valley station of the ski lift with matching ski hotel, you go to the right of the main road to the beginning of the Serrai di Sottoguda (ITAMV1512). Here you’ll find a stretch that is paved, and moreover runs a tourist train, but the gorge is very nice and quiet, once you get past the new car bridge across it.
You continue through the car-free village Sottoguda (ITAMV1513).
At the end of it, you return to the main road. You go to the right and immediately after the bridge to the left (ITAMV1514). Here, you’ll find a walking and cycling path to Alleghe. The waymarks are not always perfect. I encountered difficulties in Peze (ITAMV1519) and Saviner (ITAMV1524). If there is a choice between a bicycle and /or walking path and a path for walkers only, choose the path, considering it is usually slightly shorter. The denivelation is not substantially greater.
Here too, the waypoints may provide help.
When you reach the lake (ITAMV1533), you have to turn left towards the road (ITAMV1534). Here you can walk right off the road to the beginning of the village (ITAMV1535). If you follow the main road, you will come across a part with no sidewalk. I prefer the variant along the Lake (ITAMV1536) after which you continue towards the church.
I stayed overnight in Hotel del Alpi (ITAMV1601).
Hotel del Alpi:
Piazza Kennedy 1, Alleghe
info@allealpihotel.com
Tel. +39.0437.523310
Cell. +39.335.5954947
(same owner as hotel Alleghe)
Room: € 100: large buffet with all options (2024)
Dinner: choice of 3 starters, 3 main courses, dessert, and bread.
95% retired Italians.
Alternative for price-conscious travelers:
Hotel Garnì Il Cirmolo:
Room: from 48€ Booking.com from 65€
Higher up the valley, which may lead to a different stage split-up.
Alleghe: Coop village shop, post office, banks, and ATMs, pharmacy
Day 16: Alleghe – Passo Duran (21,2km – 10u + 1500m -850m)
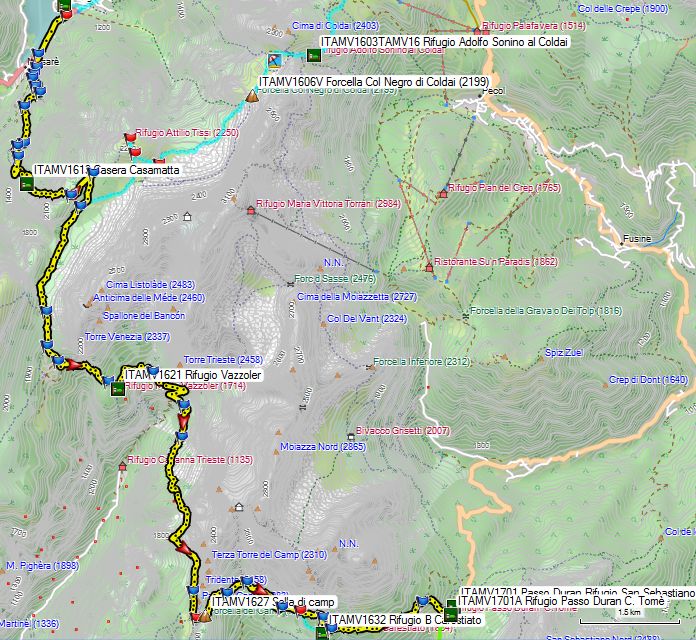
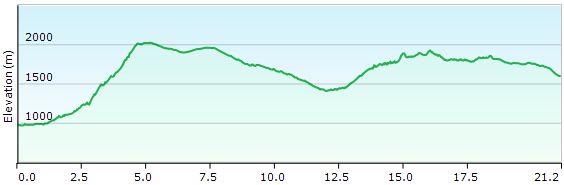
From the high part of Alleghe (ITAMV1601), there is a possibility to walk in descend to the parking at the lake, without having to follow the complete detour of the road. Once back on the road (ITAMV1602), you can walk parallel to the road along a cycle path running towards Massare.
Upon entering Massare (ITAMV1603) you can walk diagonally left uphill. At first, you still walk on asphalt, which becomes a gravel road until you reach the foot of a waterfall (ITAMV1608), where the brook is crossed along a rather rickety bridge.
The first stretch is fairly flat, to continue climbing towards a second stream (ITAMV1610). This stretch is quite soggy.
From there on, the trail begins to rise strongly, but without a lot of technical difficulties up to the Casera Casamatta (ITAMV1613). When I passed there, the hut wasn’t open. There are outdoor toilets and a cable car for supplies.
From the hut on, the path starts to rise very sharply. You pass a few technical passages with securing cables. The last 200 vertical meters the path is really unpleasant narrow and you must proceed along it very slowly because the slope is very steep here.
When at waypoint P14 you are up. Then follows a traverse to another pass, where it is forbidden to descend (ITAMV1615). Here you can continue towards the Rifugio Tissi (ITAMV1615A). Personally, I think you better continue walking in the direction of the Rifugio Vazzoler. For this purpose, you descend to the right along the path through the Val Civetta in the direction of the Rifugio’s Tissi and Coldai (ITAMV1616).
Again you continue in the same direction. The path rises a little to the Sella di Pelsa (ITAMV1617) to descend definitive from there in the direction of the Rifugio Vazzoler (ITAMV1621).
Info 2007:
Vazzoler rifugio (1714m):
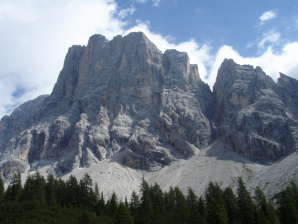 CAI – June 1 to September 30
86 berths
+39 0437 1956619
rifugiovazzoler@gmail.com
Tel: 0039 / (0) 437/660008.
The bunkhouse is the small house next to the main building. It smells a kind of musty and there is French toilet. Maybe you can take a room here. That costs only a few EUR more.
Half board in the bunkhouse: 47 € (2024)
Half board in a room: 57,50 € (2024)
Menu: minestrone, schnitzel with fries without salad, dessert.
Very meager breakfast: one roll and two small pieces of toast.
From the Rifugio Vazzoler (ITAMV1621) you descend further down along a gravel road until you reach a hairpin bend, right before a second riverbed (ITAMV1623 ). Here, you’ll find a signpost and a path, that first remains somewhat at the same height until a third riverbed. (ITAMV1624). You also cross this one, to climb up alongside it and then to continue to rise until the first of two saddles. On the first pass, you will find a signpost painted on the rock marked Carestatio. Do not walk in the direction of the signpost, because this is a dead end, but turn around the rock and find the continuation of the path.
Just before the second small pass, there is a very steep section. After the pass, there’s a stretch of path secured with a steel cable, that in my view is totally unnecessary at that location. depends. It would be better placed before the pass.
The path further climbs towards the Sella di Camp (ITAMV1627). The path that used to go through a marshy pasture to the pass, is now redirected along the waypoint points ITAMV1625 and 26. The path now goes through a gravel slope, and then underneath a rock wall towards the pass (ITAMV1627). From this pass, you will see the hut. In a kind of dry riverbed, you find the path to the Via Ferrata Constantini (ITAMV1629 & 30). According to Hüslers Klettersteigatlas, this concerns a very serious Via Ferrata of about 8h30 ‘from this point. The Via Ferrata does not fit the nature of this tour and so you follow the trail towards the hut (ITAMV1632).
Info 2007:
Rifugio Bruto Carestiato (1834m):
CAI – 20 June to 30 September – 40 beds
Tel: 0039 / (0) 437/62949.
What meager menu; no steak or cutlet schnitzel, just a lot of polenta and local and the mountaineer meal: minestrone and pasta bolognese.
Half board: 54 to 58€ (members) (2024),
You descend along the path directly under the hut (ITAMV1633) until you get to a gravel road. You follow this road until the beginning of the path (ITAMV1634) with the indication; “Passo Duran”, and this is a bit beyond a private cabin. The pass can be reached in about 45 ‘.
On the pass, there are two rifugios, namely Cesare Tomé and San Sebastiano (ITAMV1701).
Rifugio Cesare Tomé (1601m):
Private – June 1 to September 30 – 28 berths
Passo Duran, La Valle Agordina BL
Tel: 0039/(0)437/62006
+39 3496848307
Half board in the bunkhouse: 55€ (2024)
Half board in a room: 65€ (2024)
I myself stayed overnight at Refugio San Sebastiano.
Rifugio San Sebastiano:
Passo Duran 32010 Zoldo Alto
Tel: 0039/0437/62360
Not really cheap … but no real complaints. Perfect location, to send your Via Ferrata set towards if you want to pass over the Via Ferrata of Marmol.
No actual pricing on the website!
Day 17 : Passo Duran – Rifugio Pian de Fontana (16,5km – 7h + 1000m -1000m)
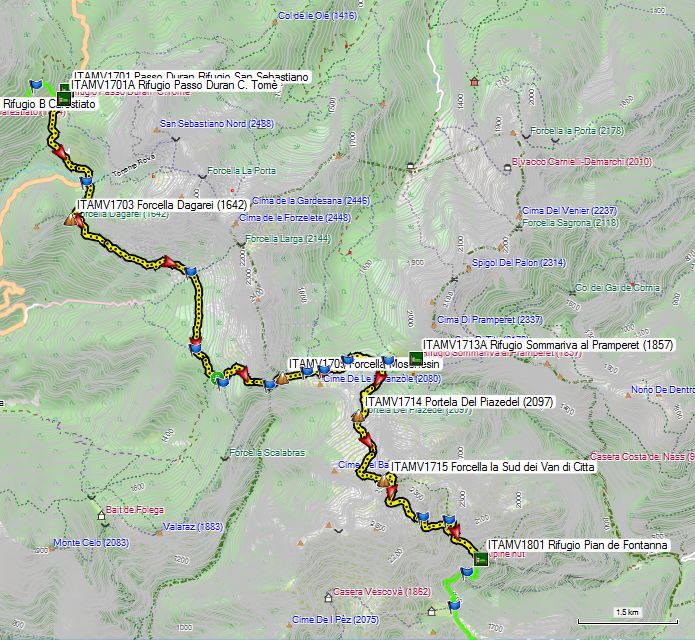
 On the asphalt of the Passo Duran, turn right. Those who pay attention will find a sign here indicating “Alta Via 1”. You descend further down from here to a wide hairpin bend at an altitude of around 1530m.
In the corner of the bend, you will find the beginning of the path 543 (ITAMV1702 ) to the Rifugio Sommariva al Pramperet. You first rise through the woods and then along a scree slope. You pass the Casera Moschesin, a private hut with a bench. This is a good place for a stop (ITAMV1706). Before the final climb to the pass, there is a turn-off to the valley (ITAMV1708). There are no indications, but you have to go straight ahead for the pass and the rifugio. Then climb in hairpin bends to the Forcella Moschesin (1940m) (ITAMV1709).
At the pass, you find a ruin and a blackboard with historical explanations in 3 languages. A few modern signposts are missing here all the more.
You must here take the first climbing path to the Colleta. On the building is painted: “Variante Panoramica”. You climb to the highest point (ITAMV1710) and then back down in the flank of the mountain. Here you join with a different path (ITAMV1712), but there are no indications. You continue in the same direction and then back up what goes to a coll until you finally descend to the hut. Within sight of the hut, there is a split of paths (ITAMV1713) between the path 543, which you followed from the pass road and path 514, along which you will continue your way tomorrow. The waymarks are arranged in such a mather, that you can only see them when you climb from the hut and not in the descent towards the hut (ITAMV1713a).
Info 2007:
Rifugio Sommariva al Pramperèt (1857m):
via Comunale di Fratta, 35
31046 – Oderzo TV.
info@rifugiosommarivaalpramperet.it
CAI – 20 June to 20 September
42 beds
Tel: 0039 / (0) 335/6096819
The cabin is quite busy during the day with day trippers, causing the staff at that times not to have much time during the daytime. Once these are gone, this is an oasis of calm.
The cabin is quite primitive. The electricity comes from a limited number of photovoltaic solar panels. Except for two toilets and two sinks, you will find no plumbing here. You will also be asked to conserve water. During the day there were some problems with the plumbing because of the crowds, but the evening this was resolved.
The bunkhouse is quite compact with three beds high, and if there are snorers …
The menu:
First course: pasta with tomato sauce or vegetable soup
Main course: turkey with polenta
Presumably standard CAI prices, but not mentioned on the website!
The breakfast only includes bread, butter and jam and coffee or tea. Asked for and got additional bread.
The first part of the climb is very well visible. From the hut see you: the Portela Piazedel (2097m) (ITAMV1714). Once on top, you are in a plain of stones. You go first to the left and follow the rock wall. The path follows the bottom of the slope to start climbing towards a grassy pass. Up there you go back to the left on the ridge (quite narrow for those who suffer from vertigo). After the quite narrow part, you go right into the side of a slope until you end at the Forcella Sud del Van de Citta (ITAMV1715). Here you have a nice view of the cabin.
The first part goes through the rock slope down with no problems (ITAMV1716). Then a piece of the grassy slope follows, which is pretty steep (ITAMV1717). Eventually, you reach the Rifugio Pian de Fontana (ITAMV1801).
Rifugio Pian de Fontana (1704M):
CAI – 20 June to 20 September
46 beds
Tel: 0039/(0)335/6096819
Presumably standard CAI prices, but not mentioned on the website!
Menu
First: pasta with mushrooms
Main: cutlet with beans
Dessert: apple pie
Breakfast: bread with marmelade
Cold showers (free).
Day 18 : Rifugio Pian de Fontana – Rifugio 7° Alpini (8 or 16,3km – 7u30′ +1000m -1000m)


You take the path underneath the terrace of the hut (ITAMV1801), which goes down and descends to the bottom of a riverbed (ITAMV1802). Then you climb the other side back up to something above the level of the hut on the Forcella di Lavaretta (ITAMV1803). On this pass, you’re still not quite at the highest point. You still have to climb to the left on the slopes of the mountain for a few tens of meters, to grasp the sight of the valley of the Vescova.
The path remains at the same height and rounds the rest of the mountain, to finally start descending into the valley. A little further, you will find the junction (30’) (ITAMV1804) to the Rifugio 7 ° Alpini and the Via Ferrata di Marmol.
 Those who don’t have a Via Ferrata set must descend to the Rifugio Bianchet (50 ‘) and the Valle del Vescova. You can do this even better the day before, so you can take the morning bus into the valley to Belluno. Or continue along the road in the direction of Belluno for a few hundred meters to find a path that climbs towards the Rifugio 7 ° Alpini (ITAMV1901). No Via Ferrata set needed. And this way you stick as closely as possible to the original plan.
Rifugio Furio Bianchet (1245m) (waypoint R04A) :
CAI – June 1 to September 30
40 beds
Tel: 0039 / (0) 437/669226
Regular menu:
- First: pasta or soup
- Main: goulash with polenta
Considering I do not like polenta, I chose two first courses: spaghetti and minestrone.
The hut warden is not difficult when it comes to room distribution and given the snoring of my fellow hikers, which I was fed up with, I asked for a snore-free room ;-).
Presumably standard CAI prices, but not mentioned on the website!
From waypoint R04 you stay temporarily leveled on your way towards the Casonette di Nerville (ITAMV1805), which you reach after ten minutes. Here you can take a break. You’ll find to the right a vague path to the Rifugio Bianchet (ITAMV1804A).
From here, the course of the path is sometimes obscured by the height of the grasses.
It runs largely parallel to the edge of the slope until you are at the height of waypoint R06, where the path makes a big hairpin bend. After this remarkable change of direction, you walk towards the Forcella di Nerville (1953m). You do not go entirely to this pass but traverses underneath it via waypoints ITAMV1807 and 08.
Fortunately, there are here and there still sticks with paint marks, as it would be hard otherwise to find the right direction, because of the long grass.
At waypoint R09, you have reached the scree. From here on, it goes up in zig-zag and here also they have failed to create a clear path. Not that this is dramatic, but it is annoying and it also creates additional erosion, because you do not always know if you’re on the right track or on a shortcut. Here you can clearly see the difference between Italy and Austria.
Once you see a rusty steal cable, tie yourself in. In the first part, you walk into a rift between sloping rock plates. It goes smoothly towards the Forcella del Marmol (waypoint R10) (2262m). To the right, you find a path here, climbing to the top of the Chiara.
I do not think it is advisable that you add this climb to this stage. Consider any possibility of lightning.
You go straight ahead and follow the direction Bivacco. First, it goes a little horizontally, but then it goes straight down to the Bivacco del Marmol. Pay particular attention to the placement of your hands and feet. Do not rush. Consider your own safety and that of others. The Bivacco del Marmol is a typical red-painted metal emergency shelter, without any further provision. Do not count on the presence of water. So make sure that your provision is sufficiently large because up at the hut there is not a drop of water available (unless it rains …).
The first part contains a lot of “walking” landscape, being unsecured. These stretches are relatively more dangerous than the secured ones. It’s of little use to take your sticks from your backpack because the unsecured stretches are never long enough. Also, sticks will hinder you on the secured stretches. Use your hands in any event and watch the paint marks to keep you on the right path. With low clouds is not always evident. Below you will find a ridge where you walk in for a long time. Here I felt a moment like I was in the Brenta Dolomites with its famous Bocchetta way.
Normally a Via Ferrata is constructed in such a way that the key passage is located at the beginning of the Via Ferrata. The aim is to discourage people with sufficient experience from continuing upwards and consequently bringing themselves and others in difficulties.
The downside here is that you do the Via Ferrata in the opposite direction and that the key passage for you is at the end of your ordeal. An additional disadvantage is that your backpack is possibly heavier than usual, even on a multi-day Via Ferrata tour. Moreover, you are climbing down 90% of the time. This means that you will always have to look underneath you looking for good support for your feet. This is not conducive to people with vertigo.
In my opinion, the key passage exists of two separate sections: one through a slot, with a vertical passage where the cable is on one wall, but where you have to have the reflex to use both walls in your quest for secure points. Furthermore, there is also a ladder passage with slight overhangs and all of that at the end of the day.
Despite this Via Ferrata being rated as a “C”, I personally think that you should be able to climb a “D” to bring this adventure to a successful end, considering the fact that you are climbing down and that you do this with a heavy backpack.
Down the cliff (ITAMV1811), you get your sticks out, because there is still a descent of 275m on the menu, and this along a fairly narrow but stable path.
Rifugio 7 ° Alpini (ITAMV1901) :
infosettimoalpini@gmail.com
+39 3400016896
+39 3478801913
Half board including a night in the bunkhouse: (no complaints)
Presumably standard CAI prices, but not mentioned on the website!
Bedrooms with 3 beds above each other, duvets. And shower, warm at a fee, cold free. Little privacy at the sinks. Hut slippers available. The cabin has a material cableway which is invisible during the descent.
Day 19 : Rifugio 7 ° Alpini – Belluno (11,4km – 4h +1 50m -1250m)
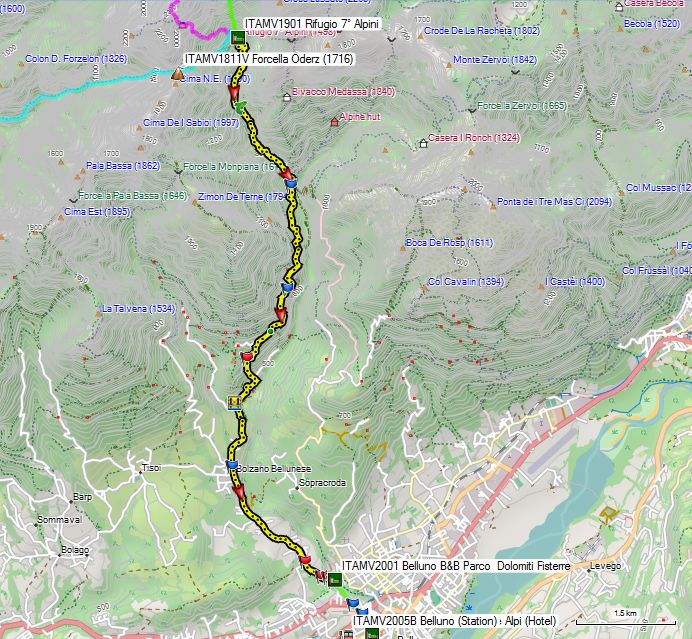
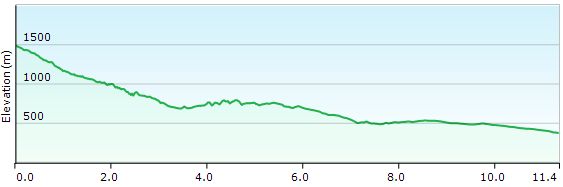
The cabin (ITAMV1901) quickly disappears from sight. The path descends sharply. In total, you cross a river four times. The first time, it is a sidearm. At the next three bridges (ITAMV1903) each time you cross the main river.
After this last bridge, the path goes up and down to the parking lot at the beginning of the asphalt road (ITAMV1904). You’ll find the Case Bortot here, where you can eat and drink. From here, it goes steeply downhill to the Ponte del Cargador (ITAMV1905), just before Gioz.
Here it goes back up again to Gioz, where you start the final descent to Belluno.
From Bolzano Bellunese a city bus takes you to the center of Belluno. The road is quite busy with traffic and only in the center, there are sidewalks or a passable roadside.
Beyond the village Vezzano, you can get away from the main road via a shortcut (waypoint S08) along a one-way street towards the Parco Dolomiti Fisterre B&B (ITAMV2001).
Parco Dolomiti Fisterre B & B :
The cheapest overnight stay in Belluno.
Disadvantage: you literally invade the privacy of your host couple.
Via Michele Cappellari 55, Belluno.
Tel: 0039/3317/945 295
Nice house, nice toilet, a little more noise than expected, because of the one-way traffic. Friendly people. For an official of the pension service and a director of a biscuit factory, they are bad at calculus. From €42 (2024) However, often fully booked. According to photos, more luxurious than before.
Albergo Capello e Cadore:
In this hostel, I slept after I took the train from the Karwendel. I arrived at around 23h30.
Single: € 65 (2024 on the hotel site)
0039/0437 / 94.02.46
Good hotel, very centrally located and yet quiet. Very copious breakfast.
Day 20 : Belluno – Tarzo (28 of 33,5km – 8u + 800m -850m)
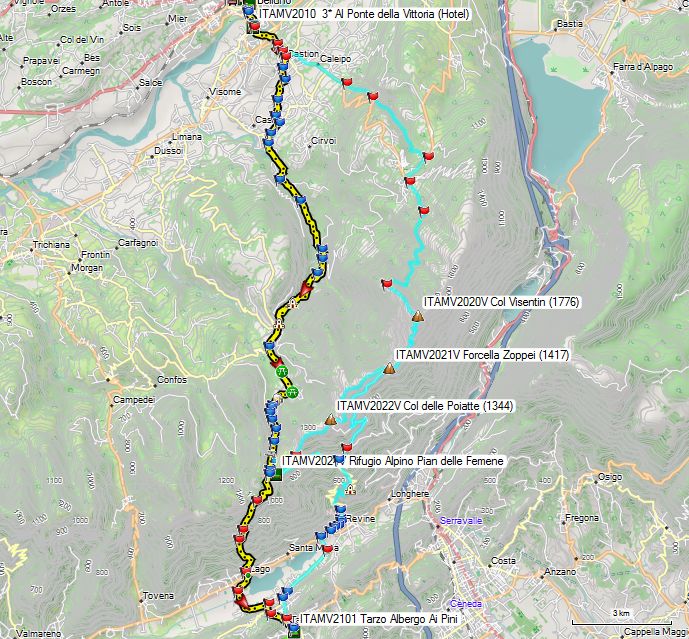

From the B&B (ITAMV2001), you cross the bridge (ITAMV2009) and turn to your left (ITAMV2002 ) direction “Centro”. You pass a general nutrition store with long opening hours.
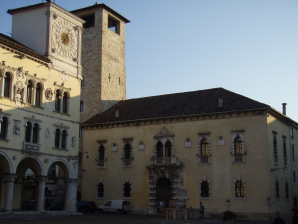 You arrive at the end of the street on the main road (ITAMV2003) and follow it to the left. At the end of the street, you need to cross it and then cross the main street (ITAMV2004) to be able to continue in the same direction.
If you turn right at the next intersection, you arrive at the railway station. The square in front of the station is also the bus station. Here arrives the bus which goes through the Valle del Vescova, which you could take after descending from the Rifugio Bianchet.
You keep going straight ahead and pass along the Hotel delle Alpi.
Hotel delle Alpi:
Via Tasso 16, Belluno
Tel: 0039/ 0437 / 94.05.45
Single: € 90 (2024)
You arrive in a square with a car park, at the end of which you turn right (waypoint T05).
If you turn left here, you can find the Albergo Capello e Cadore (waypoint T05A ).
Albergo Capello e Cadore:
In this hostel, I slept after I took the train from the Karwendel. I arrived at around 23h30.
Single: € 65 (2024 on the hotel site)
0039/0437 / 94.02.46
Good hotel, very centrally located and yet quiet. Very copious breakfast.
If you go down to the right, you arrive at the central Piazza dei Martiri.
You cross the square and continue along the Via Trenta Aprile towards Piazza del Duomo (ITAMV2006). Here you will find the historic Pallazo dei Rettori and the new town hall.
Here you will also find the tourist office and an escalator descending to the parking lot by the river. The tracklog leads you behind this building (ITAMV2007 & 08) to descend along an ordinary staircase towards the same parking lot (ITAMV2009).
You cross the parking lot towards the exit (ITAMV2010) where you turn left. The first bridge over the river (ITAMV2011) is prohibited for pedestrians. And so you continue along the river towards the second bridge (ITAMV2012). This bridge is a one-way bridge for cars. Consequently, you can safely cross the river here.
You walk up to the roundabout, where you turn left into the SP31, in the direction of Castion (waypoint T13). This road carries already less traffic than the SP1, but mornings are still very busy.
Follow this road until you arrive at the Via Castelet (ITAMV2014) at a culmination point. This turnoff allows you to get away from most of the traffic. At a right-angle bend (15), turn left. At the end, you arrive at a T-junction (ITAMV2016) at which you turn off left again. At the end of the street, at a grove (ITAMV2017), you turn right. The road continues to climb and after a turn, you arrive at a couple of houses (ITAMV2018). Here you maintain the same direction. The road twists and at next junction (ITAMV2019), you continue straight ahead towards the houses. At the next junction just before a church (waypoint T20), you turn right. You arrive at a T-junction (ITAMV2021), where you turn right.
You continue on this road until you cross a stream (ITAMV2022). Here you turn right along the stream. Further on, you cross a tributary of the creek. At the next intersection (ITAMV2023), go straight ahead in a gravel road (Via Tisson). At waypoint ITAMV2024, turn left, to return to the main road.
You pass the hamlet Cet (ITAMV2026 ) and continue your way in the same direction.
At (ITAMV2027 ) you join a road to the left, which is a little busier, following the same direction.
You will follow this same road to the village of Valmorel. The road is very quiet and is mainly used by local people and cyclists. It rises slowly but surely.
Valmorel (ITAMV2034 ) has new and nice, renovated (holiday) homes. It is apparently a place where one wants to live. Again you continue straight ahead in the same direction.
When the main road has reached its culmination point (ITAMV2035 ), you turn left and continue to rise further. At waypoint ITAMV2036, you will find a nice picnic area, which invites you for a break. Somewhat further at waypoint ITAMV2037, you’ll find another one. Before a gate, the road makes a right turn to finish on a farmyard (ITAMV2038), where you can drink something. From here on, you follow a sketchy trail through the meadow. There are some waymarks here of a mountain bike trail. After a first bend to the left, the road becomes even vaguer. There is a kind of junction, where you turn to the right crossing a meadow diagonally, to reach the fence (ITAMV2039). The road improves. You cross a stream (ITAMV2040) and climb up between pastures to an even better road (ITAMV2041). You follow this road to the left. At waypoint ITAMV2043, you go diagonally to the right. The road is again somewhat worse and continues to rise. At waypoint ITAMV2045, you will find a source of uncertain quality. Only slightly higher, the road is first paved with stones and little further you reach the asphalt (waypoint ITAMV2047). Here you turn left, to arrive at a farm (Rifugio Mamel) (ITAMV2048), where you can spend the night (according to the information found on the spot).
From here on, you can descend via the SP 159 into the valley of Lago di Revine. Those who don’t like the asphalt can descend along a marked path (ITAMV2049) down into the valley.
The first part of the path is good. Lower, the path is laid out as a sort of Roman road and the walking on these stretches is very unpleasant. From waypoint ITAMV2058 on, you better walk, along the road, considering the fact that you don’t get any profit out of following the path, which makes more distance and is sometimes very unpleasant to walk on.
At waypoint ITAMV2072, you reach the SP35, and together with it, lots of traffic. From here on, it is unpleasant to walk to Tarzo. You reached quickly the turn-off of the SP 153 (waypoint ITAMV2073). From here on, it is a bit quieter but the walking still remains uncomfortably by the lack of a good walkable side of the road. At waypoint ITAMV2077, you reach the village and from here on, you can find a sidewalk. You walk to the other end of Tarzo, where you can find the lodge Albergo Ai Pini (waypoint ITAMV2101).
Albergo Ai Pini:
Vicolo dei Pini 6 Tarzo
Tel: 0039/0438 / 58.62.06
I was here on what is normally their day off. They are closed to outside guests, but not for people who stay here.
Room: € 75 (2024)
Dinner: tagliatelle Bolognese, steak with baked tomato, little potatoes, lots of bread and a very large salad.
Breakfast: bread, jam, and cake, but no meat or cheese.
Day 21 : Tarzo – Susegana (25,5km – 5h15′)


Because I could not find the route as described in the guidebook on my digital maps, I decided to walk the first section (2km) along the SP635. That’s not very pleasant, considering this road is very busy.
 When at waypoint ITAMV2102, you can leave the SP635 for a local road. When at waypoint ITAMV2103, you cross a stream and higher up, the road climbs very steeply. Above at a crossroad (ITAMV2104), you come across a waymark “Munich – Venice”. Here is a very nice and quiet stretch along a gravel road longing a stream and through a wooded area. Between waypoint ITAMV2107 and 08, the gravel road continues along the same bank as opposed to what is indicated on the map.
At waypoint ITAMV2110, you reach the asphalt again, but it remains low in traffic. Waypoint ITAMV2111 is the parking lot along the road to the Mulineto della Croda. At waypoint ITAMV2113, you can find a place to eat. At waypoint ITAMV2115, you turn left. At waypoint ITAMV2116, you reach the SP86 in the center of Refrontolo. Here you turn right. In the center at waypoint ITAMV2118, you will find accommodation facilities. No further information available. From here on, traffic is dense because of the industry in the area. This continues so until Barbisano. At waypoint ITAMV2122, you leave the SP86, but traffic remains dense because of the industrial areas around Refrontolo.
From waypoint ITAMV2125 on, it becomes quieter, because most traffic passes over the SP 38.
In Barbisano (ITAMV2129), I did not follow the main road to the right, but I walked straighter on, thereby avoiding the traffic on the main road.
Between waypoints ITAMV2133 and 34, you can’t avoid the main road. At waypoint ITAMV2134 you can turn left, following a very quiet local road that rises to the center of Collalto (high mountain).
At waypoint ITAMV2135, you find a restaurant and at waypoint ITAMV2136 a quiet corner with a bench, dirt bin, and a water tap. At waypoint ITAMV2137, you leave the paved road for a gravel road between vineyards. On the ridge, the road passes through a forested area, so you can walk in the shade. At waypoint ITAMV2138, the road hits the asphalt again. It remains quiet until waypoint ITAMV2140. From here on, there is local traffic. You round the castle and descends towards the center of Suzegana.
At the roundabout at waypoint ITAMV2141, you continue straight ahead. On the village square, you will find some benches with some trees (ITAMV2142). At the end of the square, you turn left. At waypoint ITAMV2143, you find a self-laundry. You continue in the same direction. When at waypoint ITAMV2144, you turn right and at waypoint ITAMV2145 left, to find the hotel Astoria (ITAMV2201).
Phi Hotel Astoria****:
Via Vigna 29, Suzegana
Tel: +39 0438 738525
info@phihotelastoria.com
Single room with breakfast: € 113 on the hotel website :-(, 78€ (on booking.com!) (2024)
Very spacious room, air conditioning temperature not controllable, the tube of the hair dryer was broken :-(, very good breakfast.
To compensate for the price of the room, I went to eat at a Take-Away Pizzeria on the SS13 (waypoint ITAMV2144). There is also a buffet bar, where you can eat pizza on the spot. The pizza is made with very large chunks, which is sometimes inconvenient to eat, certainly without a knife. Pizza € 6.50 Sparkling Water 0.5L: € 1, no coperto.
From waypoint ITAMV2139 you can also turn right via the hamlet of San Daniele Tombola and continue south until you cross the Sp 34 and turn left at the first intersection on a path heading west. The path slowly approaches the Piave river and at the Ponte della Priula you reach the asphalt again, where you turn left. 800m further you will find the Hotel San Carlo (ITAMV2202).
Via IV Novembre 105
31010 Ponte della Priulla
Price: 35 to 48€ (without breakfast) (2024)
Day 22: Susegana – Ponte di Piave (28,8km – 7h)
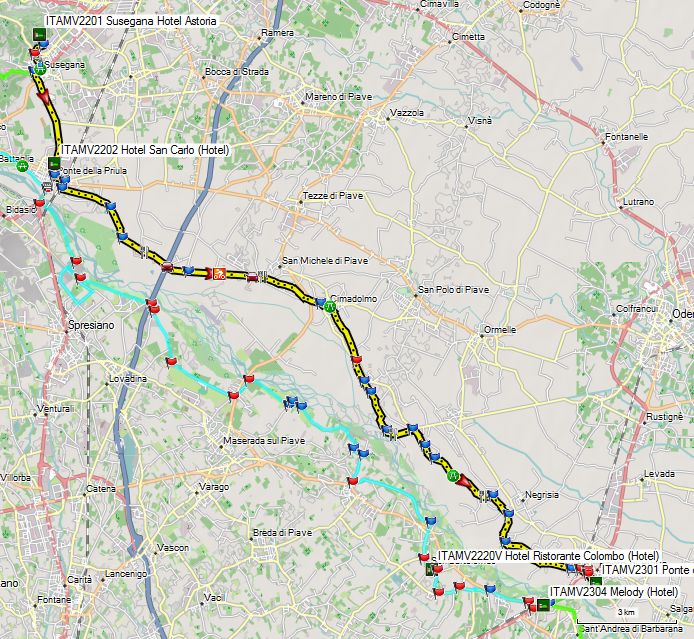

From the hotel (ITAMV2201) walk along waypoints ITAMV2145, 44, 43 & U2 back to the main road in the center (ITAMV2202).
You go to the right and out to the roundabout. The shortest route is through SS13, but that road is terribly busy. Initially, I had planned to walk along the (also busy) SP138 to a road parallel to the SS13, starting at waypoint ITAMV2203. But when I arrived there, it appeared to be a private road, equipped with a barrier. I proceeded further to arrive at the originally planned route with waypoint ITAMV2204. From here you walk along a relatively quiet road until the SP34, which you cross at waypoint ITAMV2205. From here on, you walk along a low-traffic road almost a parallel to the SP34. When at waypoint ITAMV2206, you pass a bench, but it’s a little early for that.
There is a supermarket at waypoint ITAMV2207.
At the main road, I went to the left, following the description in the guide and at waypoint V08 I walked at an oblique angle towards the railway station (waypoint V09). This is also possible diagonally via Via Secondaria Stazione. You pass under the railway track and turn to the right on the other side. Once over the Canale Brentele, you turn left (ITAMV2210 ), following the dike until an access road (ITAMV2211) to a concrete plant. Here you have to leave the dike, walking towards the access road to the concrete plant (ITAMV2212 & 13). From here on, you have to search for a path either on or beside the dike. It remains difficult walking. At waypoint ITAMV2214, the embankment makes a bend. If the dike has been mowed, it is quite walkable. If this is not the case, it is easier to walk beside the dike.
At waypoint ITAMV2217, you pass along the Ristorante Al Gabbiano, but it’s far too early for a restaurant visit. When at waypoint ITAMV2218, you pass under the highway. The bridge is a free storage space for agricultural vehicles used by the farmer. At waypoint ITAMV2220, the road surface becomes better. At waypoint ITAMV2221, you reach the asphalt. Here you turn left to the roundabout, turning right at the first turn-off and thus follow the old road through the village. At the roundabout in the village, you will find the Trattoria Al Borgo (ITAMV2222). Before this restaurant, you turn left. You continue to follow the old road through the village until the beginning of the village of Cimandolo. Here is a roundabout (ITAMV2223 ), where the ring road joins the old road. You keep straight on, to the “center” of Cimandolo. Here you’ll find a bench with shadow (ITAMV2224). You turn right in order to find a new roundabout (ITAMV2225), which is not marked on the digital map, where the old road and the ring road join again. Here you have to go to the right, following a stretch of the ring road, which is situated on the dike. Once above, you descend from the dike at the other side to find a dirt road (ITAMV2225). You follow this road to the left.
You continue to follow the dike until it makes a distinctive kink (ITAMV2229 & 30). A bit further, you arrive on the asphalt, reaching, what is indicated in the guide as Restaurante Al Treghetto (ITAMV2232). On the spot, I found nothing with this name. They proclaim themselves to have the most beautiful riverside resort on the Piave.
Beyond this restaurant, the asphalt road bends towards the main road. You pass a glass breaking mill, and just beyond this, you will find a second dike, where you follow a road just before the dike towards the right (ITAMV2233). You continue along this road until you arrive on the dike via two short hairpin bends. The dike is asphalted here (ITAMV2235). You follow the dike in the same direction until you leave it to the left at the beginning of Cartiera. Immediately next to the embankment, you’ll find a chapel with a bench and some shade (ITAMV2237). Follow the road in the same direction. You cross a stream, pass a sawmill, continuing along the Osteria Piccola Venezia (ITAMV2238). Behind this restaurant, you take the first road to the right (ITAMV2239) (Via Argine). You follow this road until just before the Piave. When at waypoint ITAMV2241 & 42, you take twice a sharp turn, to continue further in the original direction. When at waypoint ITAMV2243 & 44, you do the same again, but shorter and clearer.
When approaching the Piave you will find a first junction (ITAMV2245), where you can turn left towards the main road at a straight angle. You ignore this and proceed to the next intersection (ITAMV2246), this time with an oblique cul de sac road. You follow this road up to the point where you reach the railway track (ITAMV2247). When you turn left here, you will find a supermarket (ITAMV2247A ). The route, however, turns to the right along a footpath towards a tunnel under the railway track (ITAMV2248). At waypoint ITAMV2249, you return to the normal road coming from the entrance to the warehouse. At the end (ITAMV2250), you turn to the right to arrive at the busy main road (ITAMV2302).
You cross this main road and follow this road somewhat difficult in the same direction over a distance of 350m until you reach a gas station-hotel-pizzeria. This is the Belvhotel (ITAMV2301).
Belvhotel ***:
Via Jesolo 20, Ponte di Piave
0039/0422 / 75.91.06
Single room: 45€ (2024) (Hotel website!)
Rather an unfortunate location. Fortunately, it is not so crowded and you get a room at the back, where you are less bothered by the noise.
The difference with the Astoria is great. I actually think this hotel is not worth three stars, especially compared with one-star Hotel Garni Tosca in Lido di Jesolo. The bathroom is about as large as the shower at the Astoria. The shower here is placed between the toilet and the sink, allowing you to shower between two curtains and the floor will be wet if you must go to the toilet later. When using the toilet, you find yourself boxed in with your knees against the wall…
There is air conditioning. The breakfast is about the leanest in terms of choice of all hotel restaurants I visited.
Breakfast: sweet biscuits, no normal bread, instead of packaged toasts and some jam. But well stocked in quantity. Officially breakfast time from 06.30u, in practice: 06.45 am.
Dinner: pizzeria under the hotel: Pizza di Mare. Pizza di Mare is often disappointing, despite its proximity to the Mediterranean.
Day 23: Ponte di Piave – Lido di Jesolo (ard. 42km – ard.8h)

You walk back in the direction from which you came yesterday. On the main road (ITAMV2302) there is plenty of traffic. You defy the exhaust gases and turn left towards the river.
You cross the river along the road bridge to turn off left at the first opportunity in a narrow dike road (ITAMV2303), which immediately leaves the main road beside the dike. You walk past the village of Sant Andrea until a slight turn to the left. Here you take the first road on the right (ITAMV2305), in the direction of a large white villa. You round this house and continue in the direction of Zeson di Piave (ITAMV2306 ). In the center, you will find a bench (ITAMV2307). You continue your way through the village and near a gas station, you leave the road to climb up the embankment along a path (ITAMV2308).
On top of the dike, you find a gravel road. At the height of Campolongo (ITAMV2309), the condition of the dike worsens. When approaching the highway, you leave the dike at waypoint ITAMV2310, to head for the road (ITAMV2311) in order to cross the highway. Just beyond the highway, at the hight of a small bridge, you turn left in a side road (ITAMV2312). At the first junction, you turn right (ITAMV2313), to walk along that way parallel to the main road. At the next junction (ITAMV2314) you turn right. When at waypoint ITAMV2315, you climb back up the embankment. That way you cut a large detour off in a graceful manner. When at waypoint ITAMV2316 you’ll find a chapel on the dike near a toll boat bridge, where you can take a break. You stay on the dike until waypoint ITAMV2317. Here you can choose: either you stay on the dike or you descend from it. I do not think it fundamentally matters much what you choose here. Both are about equal. You return back on the dike (or remains on it) at waypoint ITAMV2318 and continue to follow it. The surface is now grass. You walk on the dike towards the railway. Approximately 200m before the railway track (ITAMV2321) you leave the dike and descend to the base to pivot off before the railway track and continue towards the river, where you pass underneath the railway bridge. On the other side, you climb back on the dike. You pass a cattle station and then a residential area (ITAMV2322). The dike goes around the residential area and when it meets the road, you descend towards the asphalt road (ITAMV2323 & 24). You walk along the tarmac at the bottom of the embankment toward the village. Just past a gas station (ITAMV2325), you turn right at first opportunity (ITAMV2328).
From here you on, you walk parallel to the ring road. When at waypoint ITAMV2330 you can find a pedestrian zone parallel to the ring road. When at waypoint ITAMV2331, you find a bench and trash can, but little shade.
At the roundabout (ITAMV2332), the foot or bicycle paths come to an end and you have to walk along the road again.
From here you walk about 3.5 km along the main road. The suggestion in the guidebook I found too much of a detour, especially considering the length of the stage.
You walk up to the roundabout and complete it in the clockwise sense. Take the first turn-off (ITAMV2334) and go over the bridge. In the descent, you find on your left hand a wooden staircase (ITAMV2335), which leads you to the little road under the bridge. You go under the bridge (ITAMV2335) and follow it in the direction of the river (ITAMV2337), which you then follow to the left. You cross the SP43 (ITAMV2338) and at a restaurant (ITAMV2339 ), you turn left over a drawbridge. You continue in the same direction until you see a boat bridge on the right (ITAMV2340). You cross this. There a toll of € 0.50 to be paid, but it was afternoon and there was no one to collect it.
Then at waypoint ITAMV2341, you turn left and continue to the banks of the Fiume Sile, which you follow to Jesolo.
When at waypoint ITAMV2343, you find a cycle bridge towards the main road. You ignore this bridge and persecute your way along the same bank. When at waypoint ITAMV2345, you find a pizzeria and at waypoint ITAMV2347, a B & B. From waypoint ITAMV2348 on, you follow again the river bank. When at waypoint ITAMV2349, you finally find a bench and some shade. From here on, you could follow the Via Adriatico, but it is very unpleasant and busy.
You follow the river bank until the second (cycle) bridge (ITAMV2350), where you cross the river (ITAMV2351). You round the bend (ITAMV2352) and follow not the road, but the riverbank. When at waypoint W53, you are back in a traffic-free area. If you want to buy supplies, you can do this at waypoint ITAMV2354A. From here on you continue to follow this path until you spot a high point shaped apartment building. At a waste recycling company (ITAMV2355), turn left. You walk to the foot of the apartment building (ITAMV2356) and continue in the same direction towards the street with the restaurant and hotels just behind the dike (ITAMV2357). You follow this street to the left until the Via Bafile No. 462, where you find Garni Tosca (ITAMV2401).
Hotel Garni Tosca:
Via Bafile No. 462, Lido di Jesolo
Tel: 0039/421 / 37.02.90
Booking via their own hotel website does not work. Everything is said to be full!
Alternatives from 42€ (2024) via: www.booking.com
Room with fire doors. Spacious bathroom, air conditioning. Private beach (120m). Very copious breakfast in a part of the restaurant/pizzeria under the hotel. Budget-friendly hotel, which in my opinion deserves more stars if you compare it to the Belvhotel.
Cons: noisy street because of the touristic character of the street, with many restaurants and hotel despite the one-way traffic. If you want to stay here longer, please contact the hotel directly to book only if you have a written a confirmation for a room along the back side of the hotel.
Pizza Braies:
Ard. 200m to the right of the hotel.
Good pizza, well managed pleasant restaurant.
Day 24 : Lido di Jesolo – Point Sabbioni (ard. 20km – ard.4h15) – Piazza San Marco

 From the hotel (ITAMV2401) cross the street, walking towards the beach (ITAMV2402). The beaches themselves are all franchised by the hotels. For example, there is also a section reserved for the guests of the Hotel Tosca Garni. Between the end of the gardens of the hotels and the start of the private beaches, there is a public path, where you can walk (without a dog :-)).
You continue to follow this path towards the public beach of Lido di Jesolo, next to the river Fiume Sile (ITAMV2403). Here you have to turn inland towards the bridge over the Fiume Sile. At the height of waypoint ITAMV2405, the road is relocated, so that the digital map is no longer correct. There is only one bridge between Jesolo and Cavallino (ITAMV2406 & 07), and so you have to swallow exhaust fumes here. If it has been raining here, you must also pay attention to the splash water from cars, because some drainage grates are poorly maintained. As a result, much water remains on the road surface. And if motorists don’t pay attention, you end up with wet clothes.
Just across the bridge, you’ll find an intersection (ITAMV2407), where you can leave the main road and at waypoint ITAMV2408, you’ll find another turn-off into an even smaller road. This cuts short off a corner of the aforementioned road and you return to what you can conveniently call the Camping road (ITAMV2409). You cross it immediately and walk towards the beach (ITAMV2410).
Here you walk about 5.2km along the beach. Certain areas you can walk on a paved path, certain parts you can just walk through the sand. The guide sends you in Ca di Valle inland, but then you return towards a busy road and I thank for that. You better continue along the beach (ITAMV2411, 12, 13 & 14) until you can follow the parallel Camping road again (15) towards Punta Sabbioni. Until the Ca Savio you walk along the Via Delle Batterie from one entrance of a camping towards another. At a military domain, you turn to the right (16) and at the next intersection, you turn left (17).
At waypoint ITAMV2419, do not follow the sign Punta Sabbioni, but continue straight on (no sign). The quality of the road becomes less and evolves eventually into a gravel road (ITAMV2420). The last stretch, next to a channel (ITAMV2421) has a grassy surface. Finally, you return back to the asphalt, where you turn left (ITAMV2422). Fortunately, there is a good bike path separated from the main road.
When approaching Punta Sabbioni, all kinds of private companies try to lure you to their jetty. The jetty of ACTV (public transportation) can be found by always going straight ahead (ITAMV2424).
Line 15 goes directly to San Marco. A single crossing (8km) costs a solid € 6.50. By bus to the Piazza Roma, a ride of about 60 km from Jesolo, costs only € 4.50. Understand who can …
In beautiful and calm weather you can sit on the forecastle of the ferry. Ideal for your tourist type pictures. Along the way, you’ll get an excellent view of the Delta works around Venice.
 You arrive to the right of the Piazza San Marco (ITAMV2425). So you walk from the jetty to the left until the official end of the trip. Find a (relatively) quiet spot and enjoy the crowds in the square. If you have the additional luck of finding the square in a partly submerged state, this provides additional fun for the crowds and tourists.
If you want to walk to the Piazza Roma, you leave the square along the passage under the tower with the clock. First, you follow the many signposts to the Ponte di Rialto. Once you’re there, follow the signposts to the Piazza Roma or the railway station.
On the right side of the square, you can find the office of ACTV, where you can buy a ticket to Mestre (€ 1.10).
You take bus 2 or 2A. You get off the bus opposite the Mestre station and walk a bit back in the direction of Venice. In the first street to the left, you will find the Hotel Giovannina (ITAMV2501).
Hotel Giovannina (ITAMV2501) :
Via Dante 113, Mestre Venice
0039/0419/26 396
www.hostelsclub.com (€ 2 booking fee, but still cheaper than using www.booking.com )
Hotel Giovannina is very quiet and yet very strategically located near the station. The hotel is internally quite noisy because of the staircase, which is very centrally located, and there are no separating doors between the staircase and the hallways towards the rooms. The bathroom was updated, but the toilet seat was broken. The cleanliness of the rooms could be better. The siphon of the sink was clogged for example.
Low rating on Booking (76€). Own booking site works poorly!
Via Booking you can find a hotel with 3 stars and a better rating for the same price!
Via Cappuccina 34
30172 Venice Mestre
Tel: +39 041 989755
Room without breakfast: 58,40€ (on the hotel website, 76€ on booking.com) (2024)
Under the Hotel Giovannina (ITAMV2501), a Chinese restaurant is located with a menu only in Italian and Chinese. The communication with the staff is a bit difficult.
If you walk along the street opposite the hotel towards the Via Piave, you will find there a Chinese restaurant (ITAMV2502), where they have a menu in English. The right of it you will find a department store (ITAMV2503). At the end of the square, you will find an Italian restaurant (ITAMV2504) and in the opposite street another one (ITAMV2505).
The return trip:
The next morning you take the bus towards Treviso airport. The stop, you will find left to the railway station of Mestre. This is most easily reached, by going to the left from the hotel, following a pedestrian and cycle tunnel, which you leave at the second stage. This way, you directly arrive at the bus stop of the ATVO. There is a ticket machine, but you can also buy your ticket on the bus. The timetable is entirely in function of the flights of Ryanair. From the Piazza Roma, there is also a direct bus line run by ACTV towards Treviso Airport.
The Ryanair flight took off with half an hour delay due to congestion of airspace.
At Charleroi Airport, you can buy a combined bus and train ticket to any NMBS station in the country. The machine is at the bus stop, at the section for departing flights.
Final conclusion:
Some parts of this trip for me were familiar territories to me, such as the Alta Via I and the Zillertal. Because of the weather, I couldn’t enjoy The Karwendel. Especially the National Park Puez Geisler and the Sella Gruppe have positively surprised me.
The last week, walking from Belluno to Venice, I would not do a second time. You do it to complete the entire walk, but compared to the previous days, it is somewhat disappointing, perhaps a little too ordinary? The first two days, starting from Munich, I couldn’t fully enjoy because of the weather. The specific nature and the vegetation is striking, especially in the difficult feral parts on the paths signposted by the ITV (Isartalverein).
To accomplish this journey, you have either very much time, either know your own body and physical shape, to fully appreciate the trip, so you don’t hurt yourself by straining yourself. Make sure both your shoes are well broken in. My feet sustained the most damage from walking through the Isartal, because of the combination of wet weather, long stages and more difficult terrain than I had anticipated.
In addition to self-knowledge, for this trip, you need to you need to master a multitude of techniques, including walking over rock plate, loose gravel and snow. And to a limited extent, elementary climbing techniques and self-securing techniques using a Via Ferrata set. Moreover, you have to possess basic knowledge of meteorology and be flexible in your plans.
Adjust your travel plans, depending on the weather, your physical condition, and your skills. Overconfidence leads to accidents. Come to the mountains, but return safely.
Waypoint coordinates:
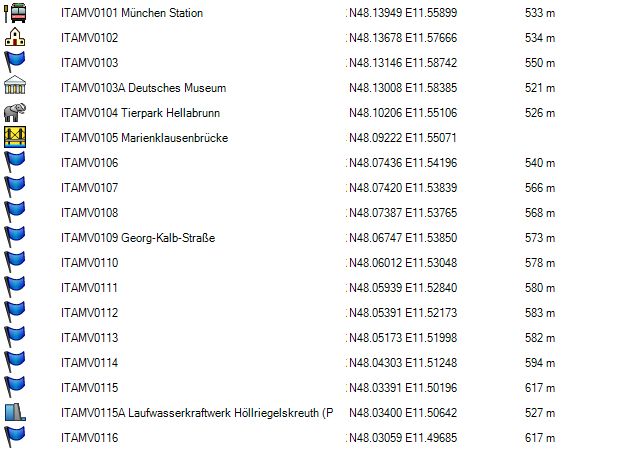


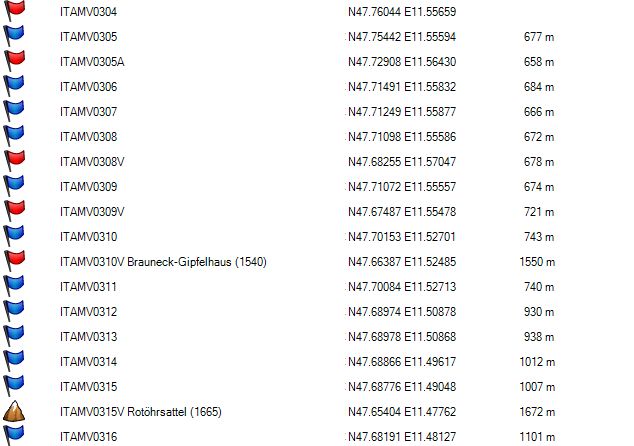
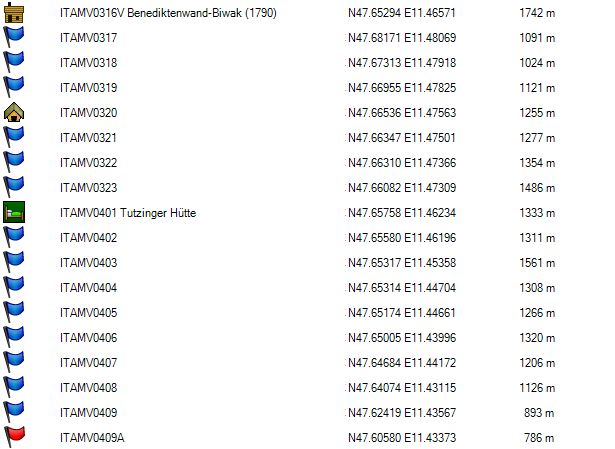


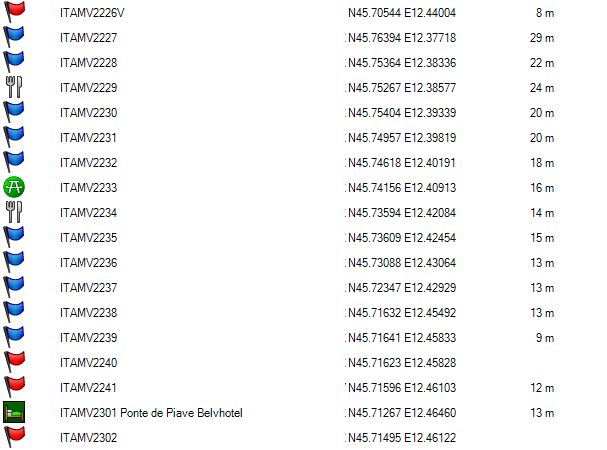

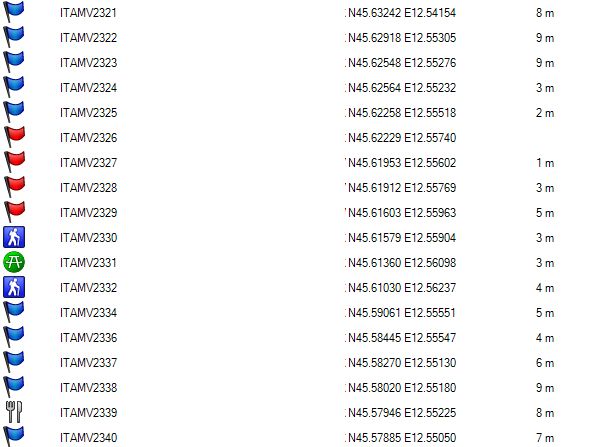

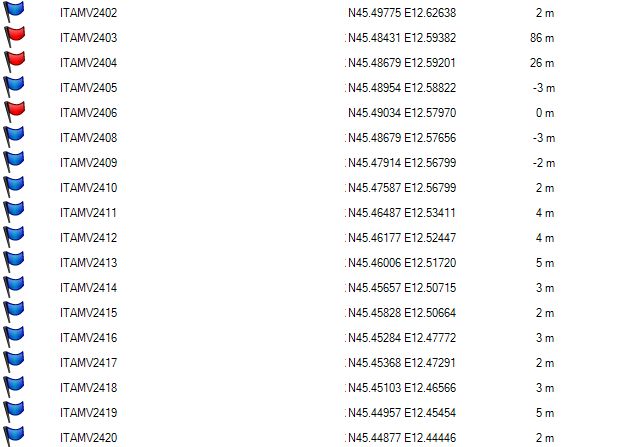

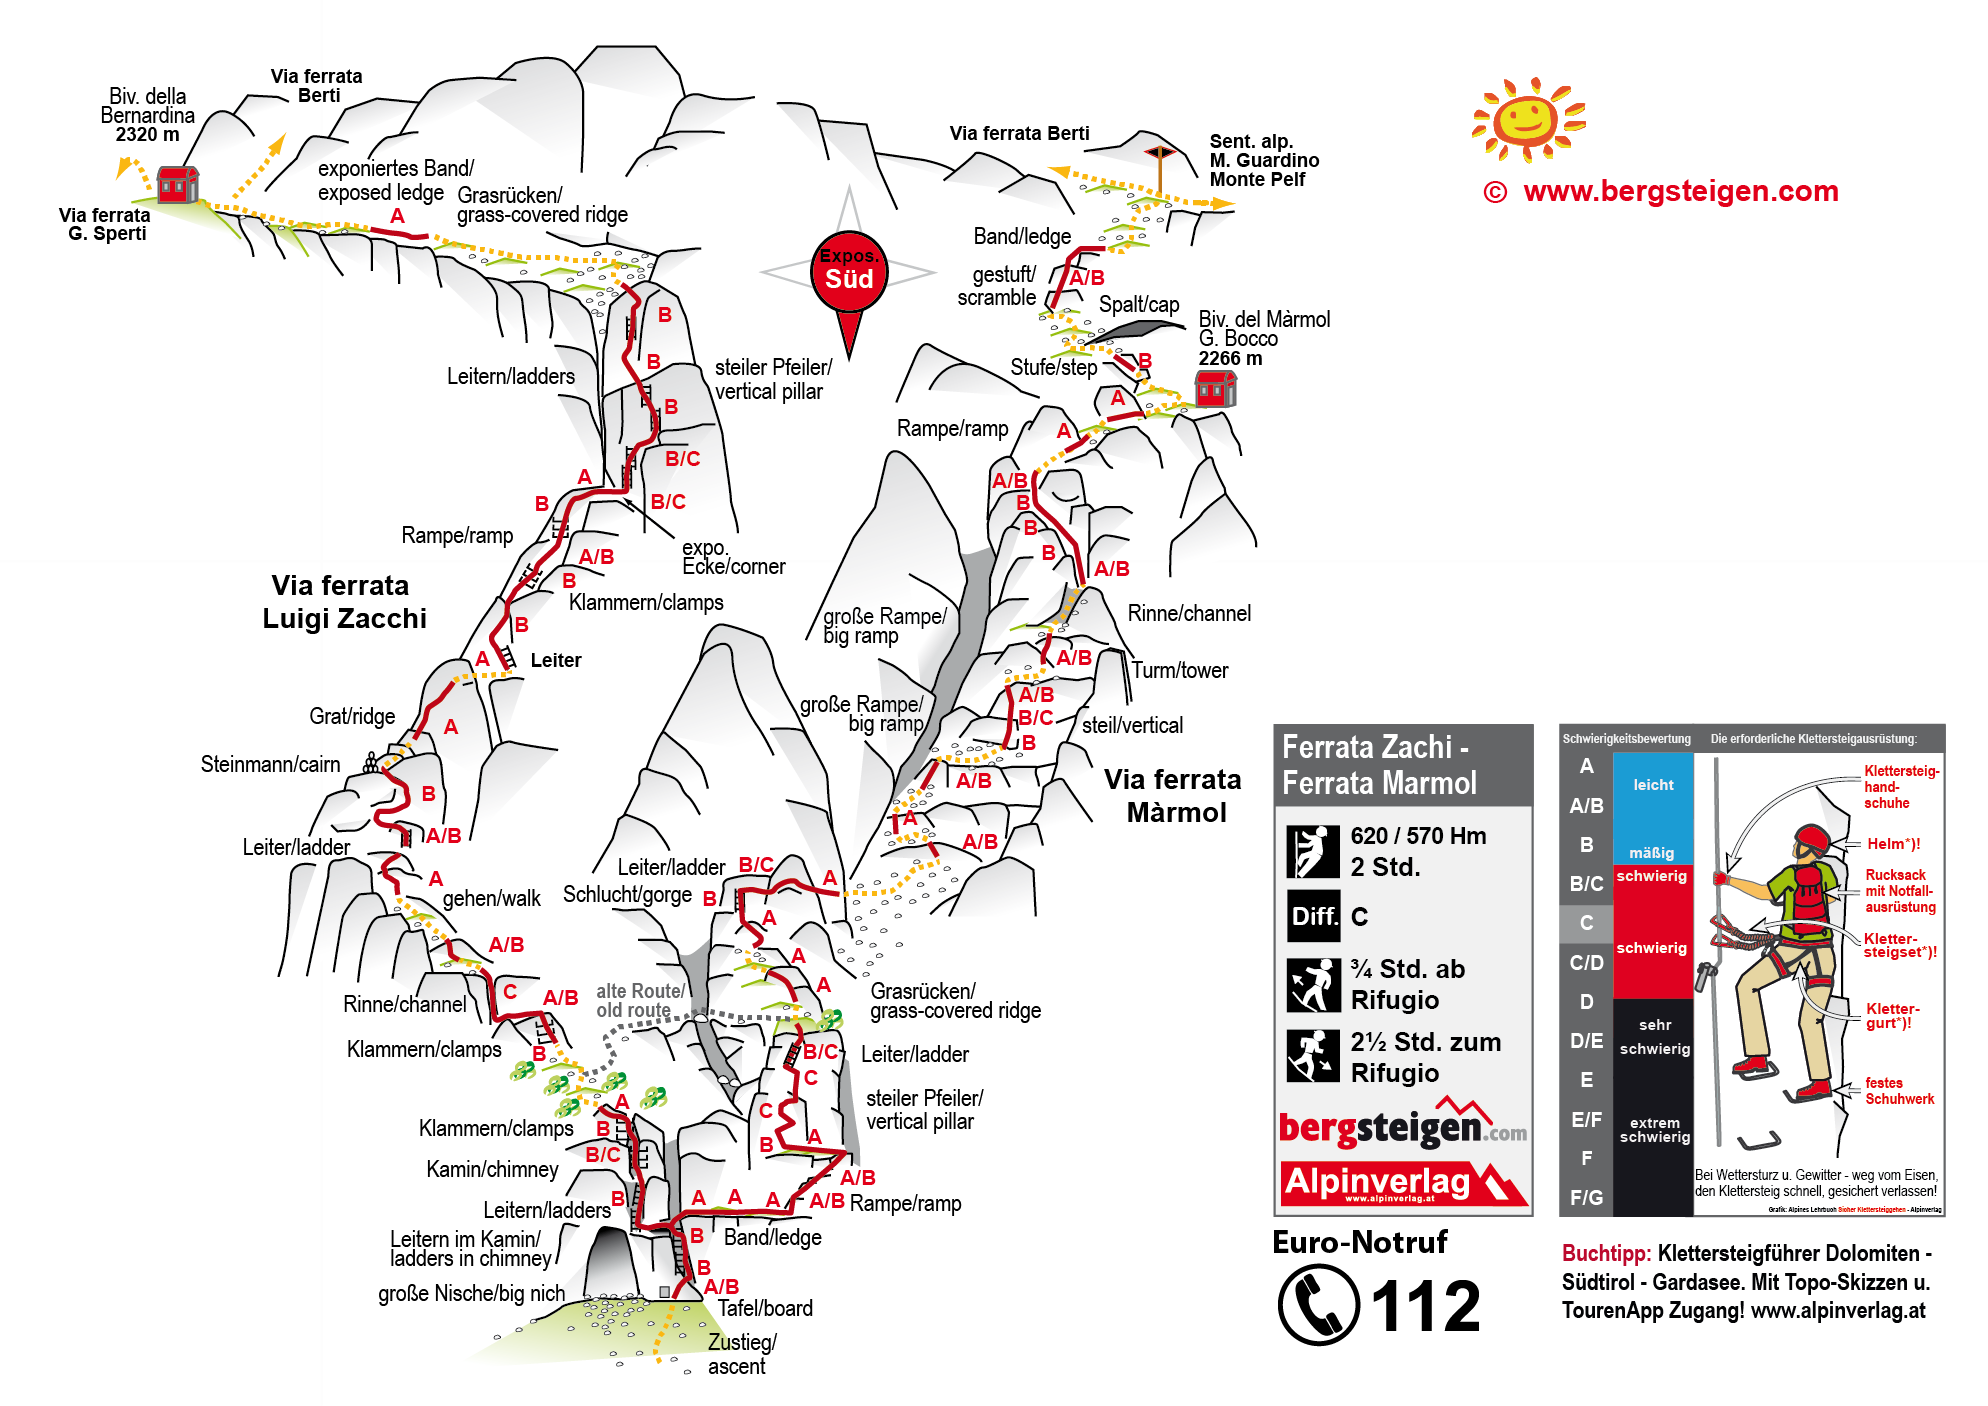